
JudeMed.AI Help Center
How to use JudeMed.AI, step by step. Pick a topic on the left or search. JudeMed.AI provides health information, not a medical diagnosis. ⬇ Download the manual (PDF)
No topic matches your search. Try another word, or contact us.
Getting started
What JudeMed.AI is #
Where: judemed.ai
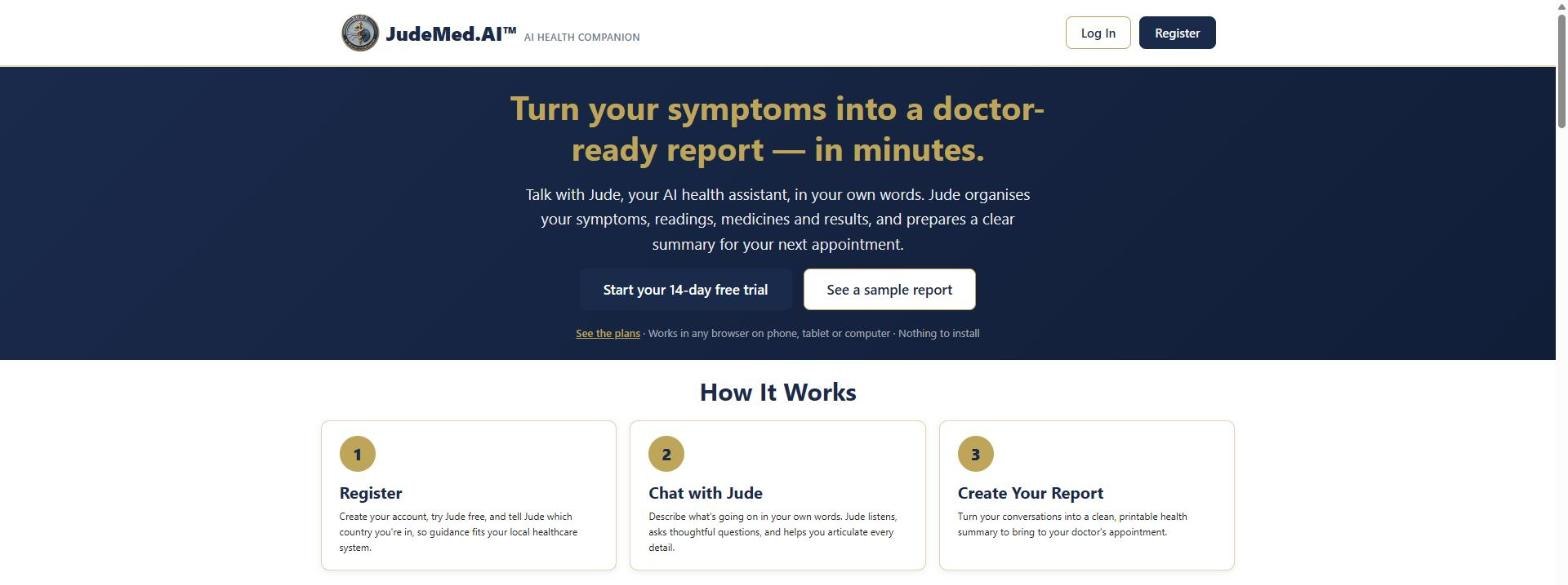
JudeMed.AI is an AI health companion. You talk with Jude about your health questions in plain language. Jude explains, helps you organise symptoms, medicines and results, and prepares summaries you can take to your doctor.
- Jude gives information, not a diagnosis. Always discuss decisions about your health with your doctor, pharmacist or specialist. In an emergency, call your local emergency number.
- Your health information is private to your account. You decide which AI services may write Jude's replies (see Before you chat) and, per conversation, what Jude may see (see What Jude can see).
- JudeMed.AI works in any modern browser on a phone, tablet or computer. There is nothing to install.
- The home page shows the plans, a sample report and how it works. Press See a sample report to see what your doctor receives.
Getting started
Creating an account and signing in #
Where: Home → Register / Log In
- Go to judemed.ai and press Register (or Start your 14-day free trial).
- Enter your name, email address, country and a password (at least 8 characters), and accept the Terms of Service and Privacy Policy. Your name may contain letters, spaces, apostrophes, hyphens and dots (2 to 80 characters). Please use a permanent email address; temporary (throw-away) addresses are not accepted. A short security check above the button (Cloudflare Turnstile) confirms that a person is signing up; it usually completes by itself.
- Open the email Confirm your JudeMed.AI account and press Confirm my email (the link works for 24 hours). This activates your account and takes you to Plans & Billing. You can only sign in once your email is confirmed. No email? Check your spam folder, or log in with your email and password (or register again with the same address) for a new link. If you were invited by your practitioner, no confirmation is needed.
- Sign in with Log In. Forgot your password? Use Forgot password on the sign-in page; a reset link is emailed to you. Both forms show the same short security check (Cloudflare Turnstile); it usually completes by itself. The button unlocks once the check says Success. If it keeps saying "Verifying", reload the page; if that does not help, switch between Wi-Fi and mobile data, or pause a VPN or ad blocker for JudeMed.AI.
Your country sets the usual units and the report paper size; you can change the units later (see Locale & Units). When you are signed in, the home page shows Go to Dashboard and Log Out instead.
To protect your health data you are signed out automatically after 30 minutes without activity, and after 12 hours in any case. The sign-in page then says so; just log in again.
We note the date and time you last signed in and last used JudeMed.AI. Only our administrators see them (for support and to count active users); they contain no health information (see the Privacy Policy).
Getting started
Before you chat: choosing the AI services #
Where: Shown before your first chat · later: Menu → Settings → AI processing
Jude's replies are written by AI services. Before your first chat, JudeMed.AI shows each service by name and you decide for each one.
- Open the Chat Screen for the first time. The page Before you chat with Jude appears.
- For each service choose Allow or Don't allow:
- Anthropic (Claude) - writes Jude's replies and reports and reads documents you upload (main service);
- Google (Gemini) - back-up for replies, reports and documents when Anthropic is unavailable;
- Groq - back-up for replies when the others are busy, and turns your voice into text (voice input needs Groq).
- Choose whether JudeMed.AI support may open your account to help you (see Support access).
- Press Save my choices. At least one AI service must be allowed for Jude to reply.
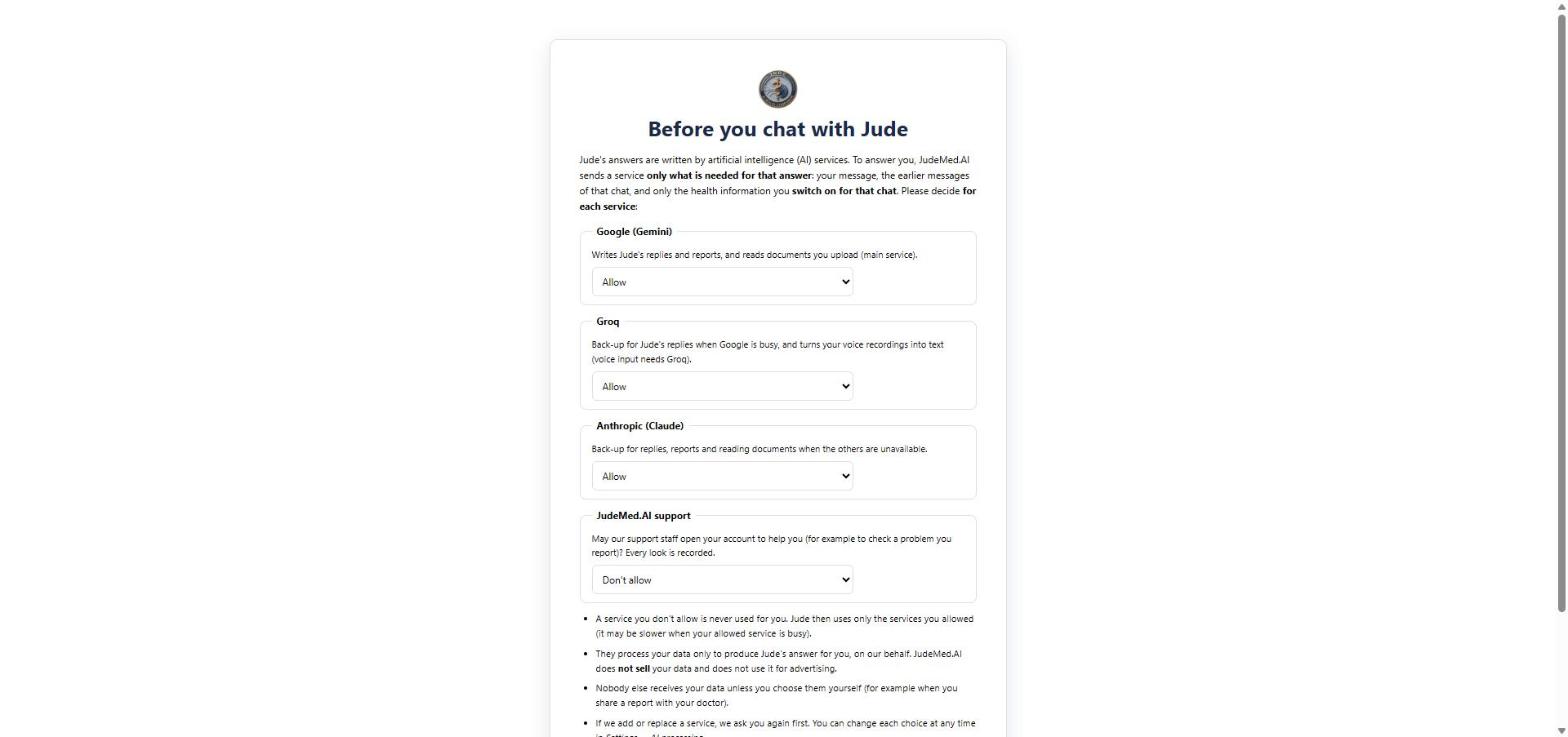
- A service you don't allow is never used for you. Only services you allow receive your message, and only that chat and the information you switch on for it. They process it only to produce Jude's answer; JudeMed.AI does not sell your data or use it for advertising.
- Not now takes you to My Logs: logs, medicine cabinet, profile and saved reports work without AI.
- When a service is added or its role changes, this page can appear once more so you can decide again. When Anthropic became the main service on 22 October 2026, it appeared only for those who had not allowed Anthropic before; earlier choices that allowed it stay as they were.
- If we add or replace a service, this page appears again so you can decide.
Getting started
Finding your way: the menu #
Where: Menu (☰, top right)
- Press ☰ at the top right of any page. The menu opens on the right.
- Press My Logs, Profile, JudeMed.AI Reports or Settings to open that group; its pages appear underneath so you can pick one directly. The group of the page you are on opens by itself.
- On a computer you can press 📌 in the menu's header to pin it: the menu then stays open beside the page. Press 📌 again to unpin. (Saved on that device.)
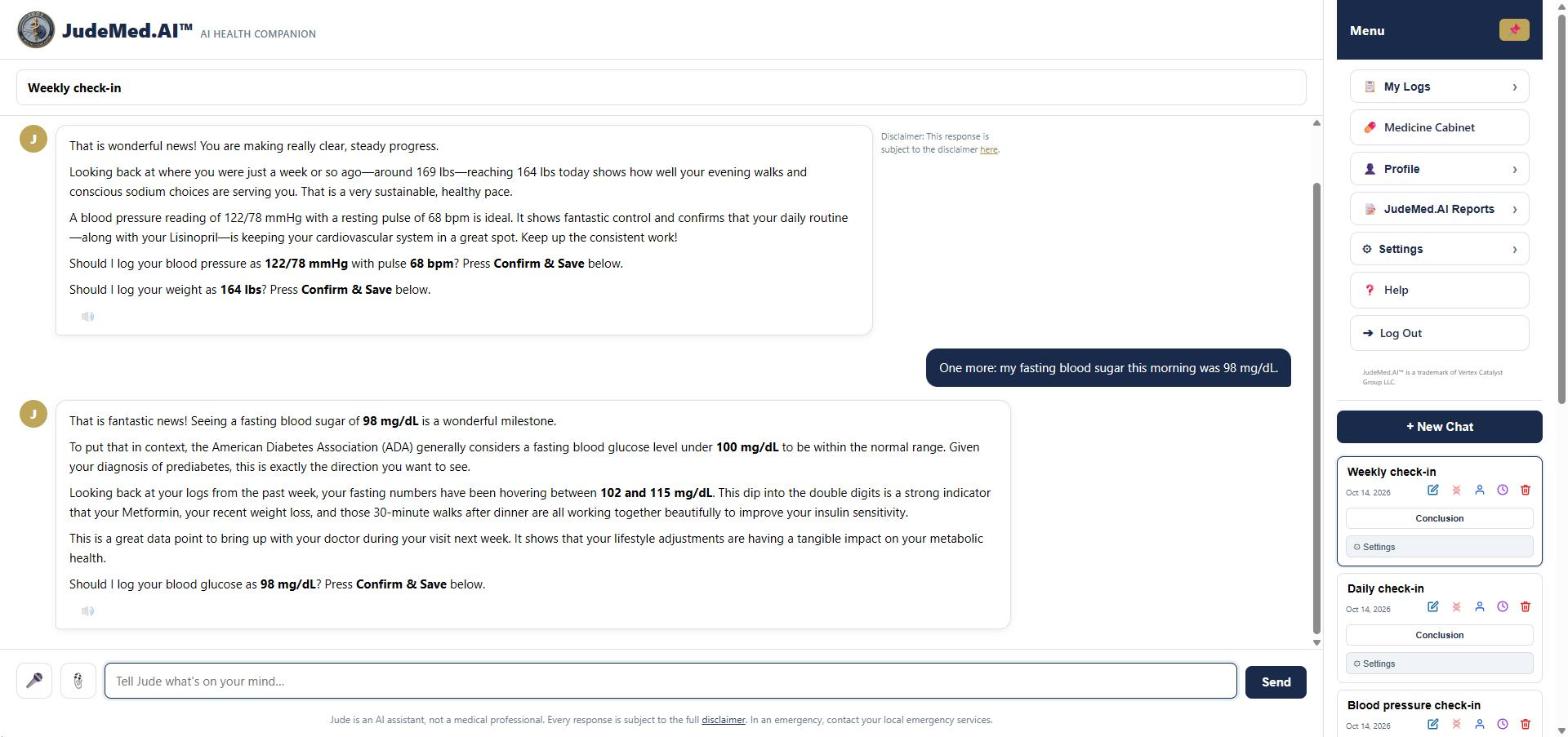
The page you are on is not repeated in the menu (for example, on the Medicine Cabinet page the menu shows no Medicine Cabinet link). On the Chat Screen your conversations are listed below the menu (see Your conversations).
| Menu item | What you find there |
|---|---|
| Chat Screen | Your conversations with Jude (Chatting with Jude) |
| My Logs | All logs, Blood Pressure, SpO2, Pulse, Blood Glucose, Weight, Menstrual Cycle (not shown when your biological sex is set to male), Hydration, Condition, Episode and Medication logs |
| Medicine Cabinet | The medicines and supplements you have at home |
| Profile | All profile sections, Patient Data, Medical History, Family, Upload Results & Reports, Import Medical Records |
| JudeMed.AI Reports | Generate Report, Historical Reports |
| Settings | All settings, Locale & Units, Account, Security, Voice Settings, Sharing Address Book, AI processing, Support access, Delete my account, Plans & Billing |
| My Patients (practitioner plans only) | Patient List, Chat Rules (For practitioners) |
| Help | This manual; it opens in a new browser tab so your page stays open |
| Log Out | Signs you out on this device. Sign out on shared or public computers. |
Chatting with Jude
Chatting with Jude #
Where: Menu → Chat Screen
- Open Chat Screen. The chat you used last opens; your other conversations are listed in the menu.
- Type your question in the box Tell Jude what's on your mind… and press Send (or Enter). Jude replies in a few seconds.
- For a new topic press + New Chat in the menu, or type
/new. Give it a name with/topic Knee pain. - Attach a lab report, X-ray, scan or photo with the 📎 button (PDF, PNG, JPG or WebP). Jude reads it and explains it. Press ✕ on the attachment to remove it before sending.
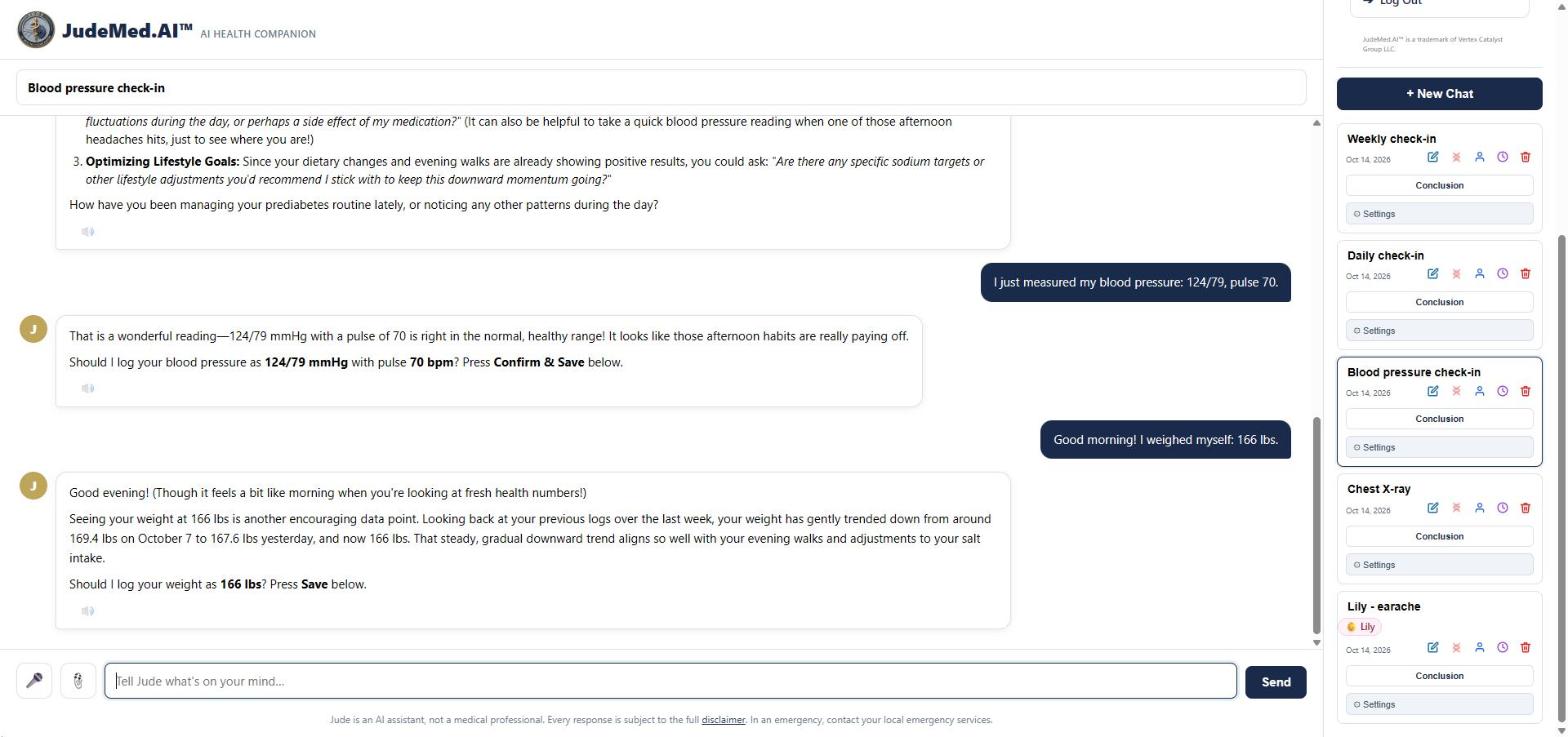
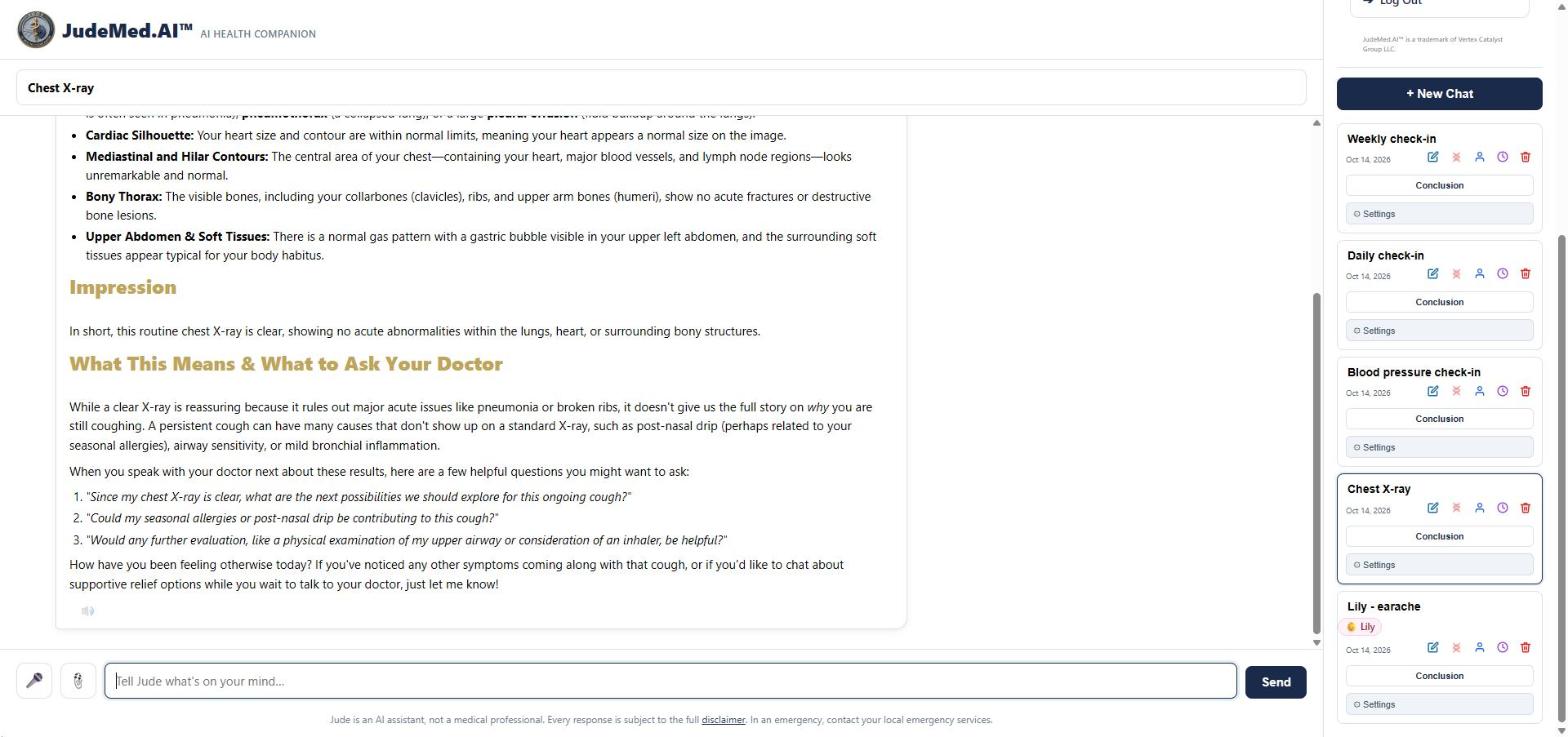
- Jude knows the date and time in your time zone. When you come back after a few hours or days, Jude knows how long it has been, sees what you logged in between (if this chat may see your logs) and asks how things are now.
- 🔊 under a reply reads it aloud. 🎤 next to the message box lets you talk instead of typing (see Voice).
- When you mention a reading or a medicine, Jude offers to log it; nothing is saved until you press Confirm & Save (see Logging from the chat).
- Medicine names are shown with their registered name, so a common spelling such as "adcodol" becomes Adco-Dol (see Medicine names).
- Very long chats: Jude suggests starting a new one; a summary of the old chat carries over automatically.
- Every reply is AI-generated information; the line under the message box links to the full disclaimer.
Chatting with Jude
Your conversations: rename, switches, Conclusion, delete #
Where: Chat Screen → the list under the menu
On the Chat Screen every conversation has a card in the menu, newest first. Press its title to open it. Under the title you see the date and these buttons:
| Button | What it does |
|---|---|
| ✎ Rename | Give the conversation a new name (same as /topic). |
| Research Mode (double-helix icon) | Switch Research Mode on for a new, empty conversation (Research plans and up; see Research Mode). |
| 👤 Profile | Allow or stop Jude's access to your health profile in this chat (blue = allowed). |
| 🕒 History | Allow or stop Jude from using summaries of your other conversations in this chat. |
| 🗑 Delete | Delete the conversation. You are asked to confirm. |
| Conclusion | A detailed written conclusion of this conversation (see Conclusion). |
| ⚙ Settings | Opens the chat's settings: Chat Subject (you or a child), Chat Aware and the data-access switches (see What Jude can see). |
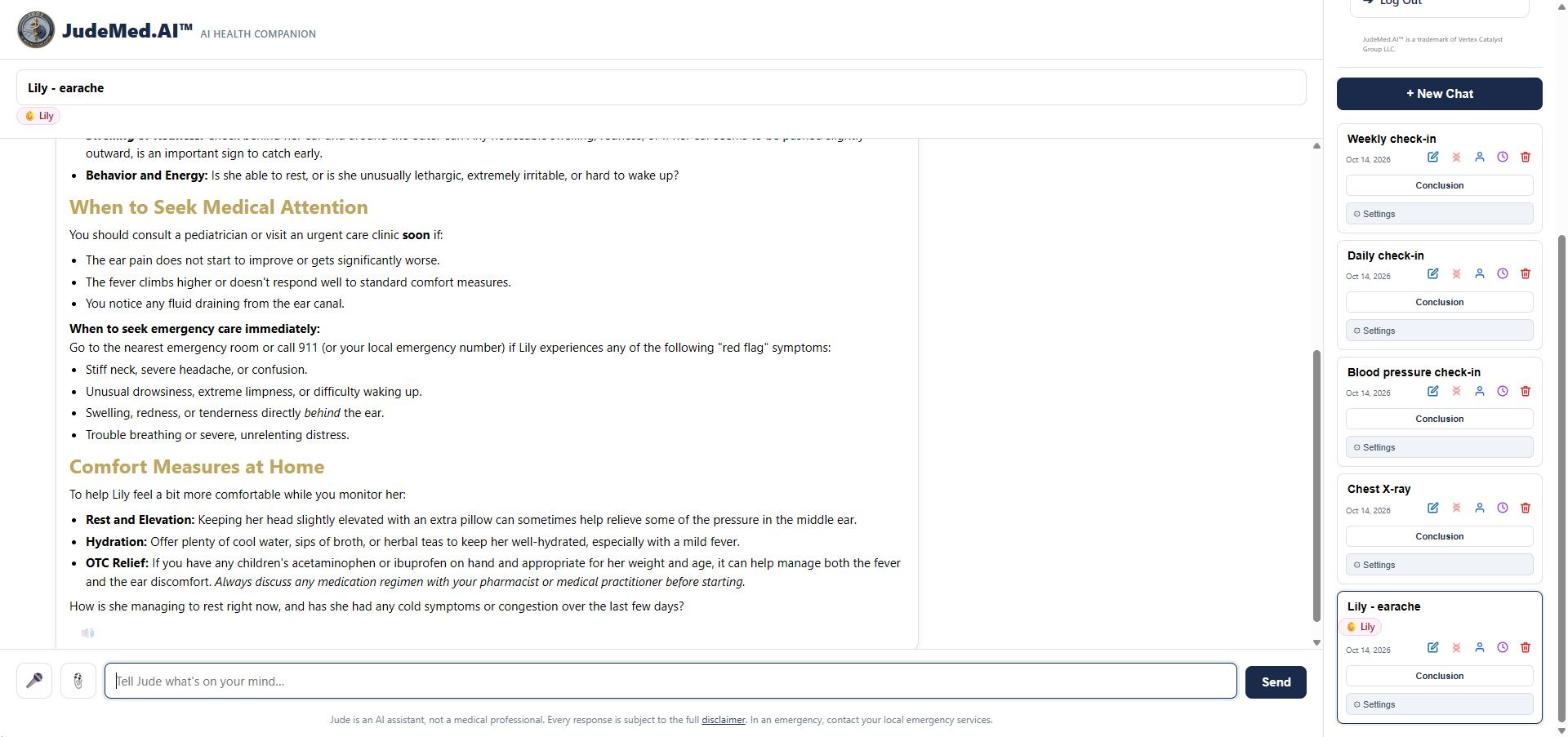
A chat about a child shows the child's name (for example 👶 Lily) under its title. A 🔒 in front of a title means the conversation is read-only (for example a chat your practitioner can view).
Chatting with Jude
What Jude can see in a chat #
Where: Chat → ⚙ Settings of the chat, or /enable
Each conversation has its own switches. A new chat shares nothing until you turn things on.
- Press ⚙ Settings under the chat in the menu (or type
/enable; the settings also appear after/topic). - Switch on what Jude may use in this chat, or All Access in the
/enablepanel. Changes are saved at once.
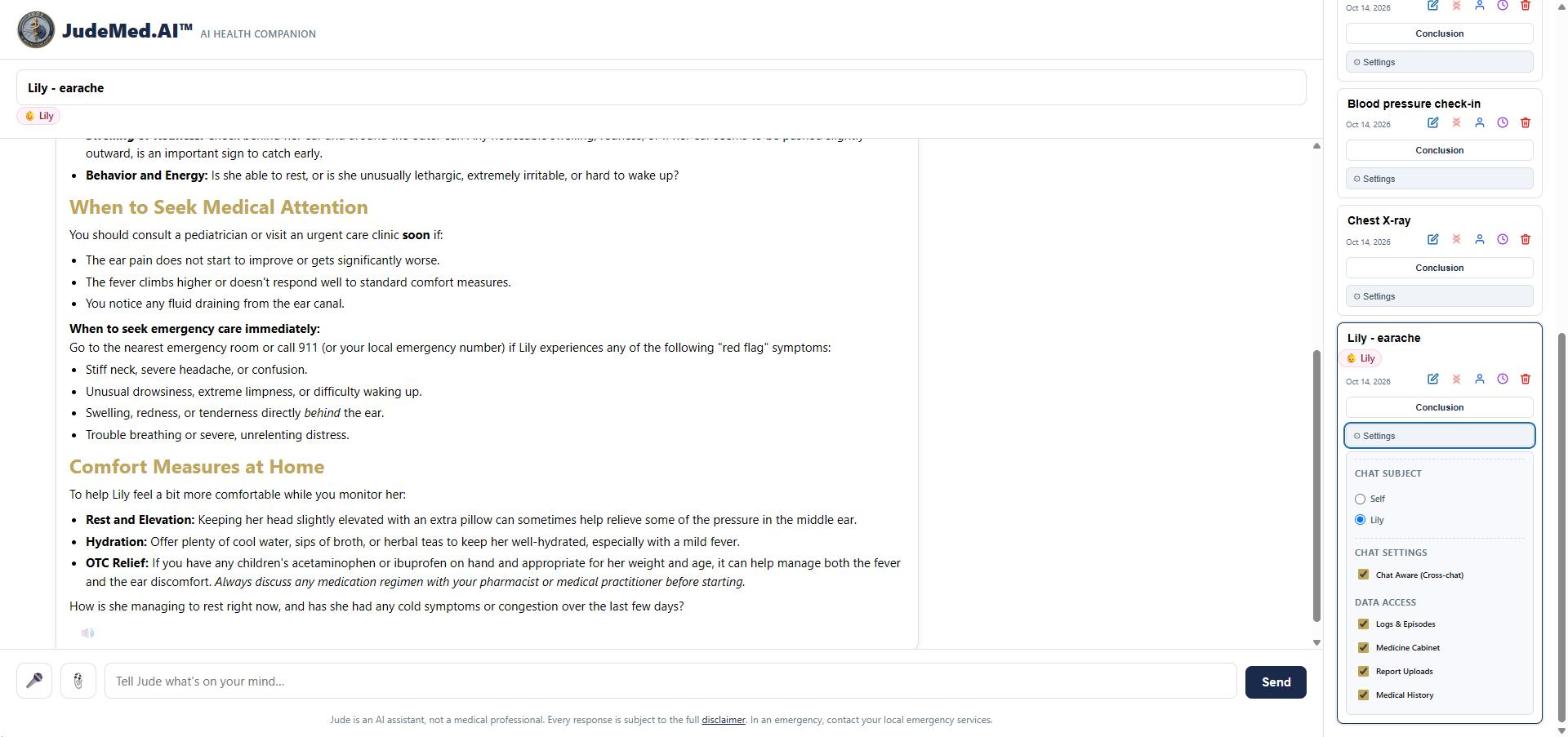
- Chat Subject (only when you added children under Family) - Self or one of your children (see Family Mode).
- Chat Aware (Cross-chat) - summaries of your other conversations. Each summary carries the dates of that chat, so Jude treats what you said there (for example "day 4 of my period" or "day 2 of my tablets") as how things were then, not as today.
- Logs & Episodes - everything in My Logs.
- Medicine Cabinet.
- Report Uploads - documents you uploaded and medical records you imported.
- Medical History - your Patient Data and Medical History (sex, age, weight, height, medicines, conditions, allergies, diet).
When something is off, Jude simply does not see it in that chat. /disable turns all of it off again.
Chatting with Jude
Chat commands #
Where: Chat Screen → type /help
Type these in the message box. /help shows the list in the chat.
| Command | What it does |
|---|---|
/new | Start a new conversation. |
/topic Knee pain | Name this chat (also lets Jude see your other chats, if you allow it). |
/enable / /disable | Turn Jude's access to your health data on or off for this chat. |
/update | Update your Medicine Cabinet, health logs or episodes from the chat. |
/upload | List your uploaded documents and their summaries (/upload refresh makes missing summaries, /upload summary 2 shows one). |
/summary | A PDF summary of this conversation. |
/create my weekly low-carb menu | Create a personal document as a PDF (menus, exercise plans, routines). |
/switch | Switch to another conversation. |
/pemf help | The PEMF session commands (plans with NeraTex Controller support; see NeraTex Controller). |
/patient [name] | Practitioner plans: link a patient to this conversation. |
/help | Show the command list. |
Chatting with Jude
Talking instead of typing (voice) #
Where: Menu → Settings → Voice Settings, or the 🎤 button in the chat
- Press 🎤 in the chat and speak. Your words appear in the message box so you can check them before sending.
- Jude can read replies aloud: 🔊 on every reply, or automatically in voice mode.
- In Settings → Voice Settings set:
- Voice mode - talk to Jude and hear the replies (also the 🎤 / ⌨ button in the chat);
- Read replies aloud in voice mode;
- Voice - Female, Male or Automatic, or pick a specific voice from the list; ▶ Preview plays it;
- Speed - slower or faster speech;
- Send automatically, without review - off by default.
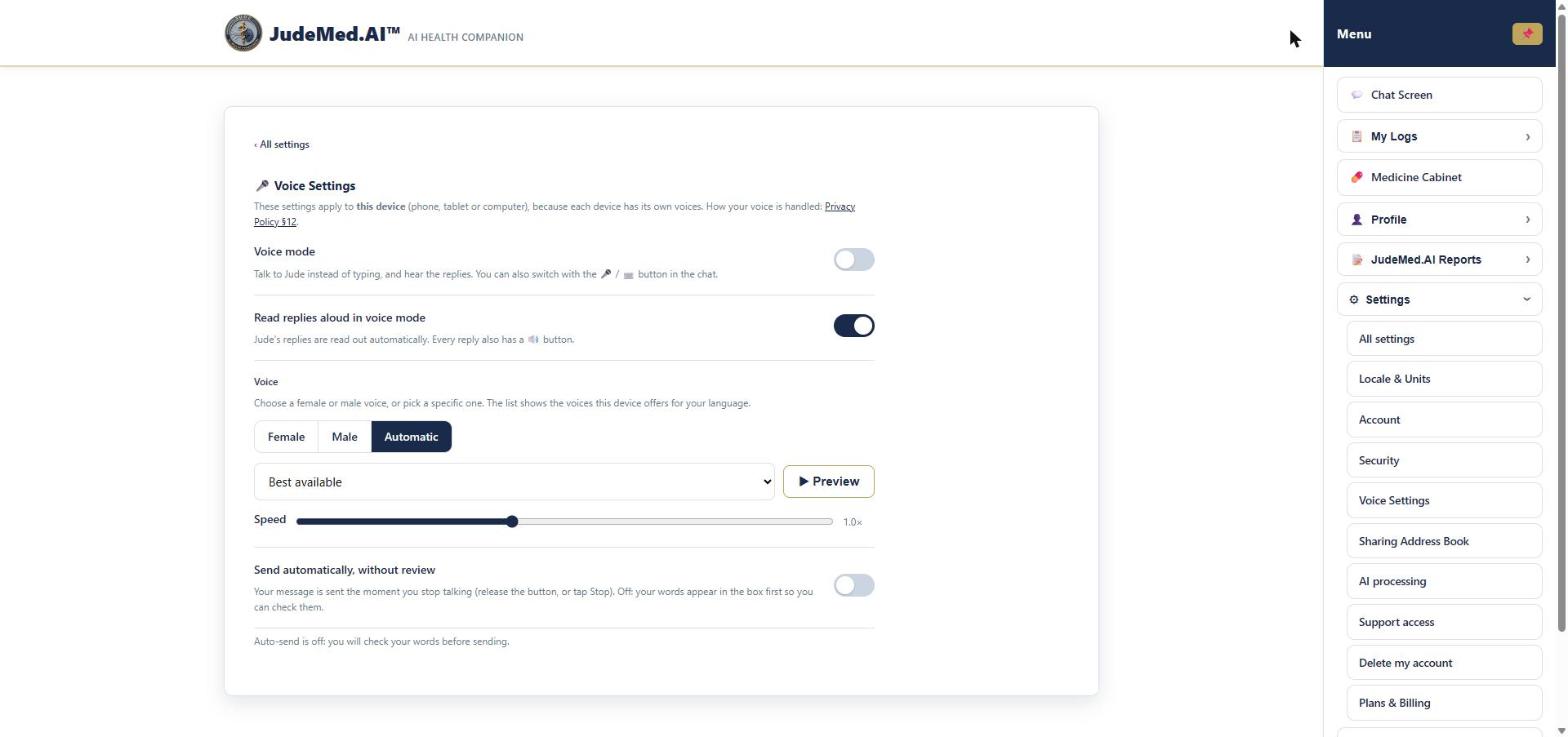
Keep Send automatically off for doses, readings and medicine names: speech recognition can mishear them, and with it off you check your words first. Voice input uses Groq, so it works only if you allowed Groq (see AI processing). Voice settings are saved per device, because each device has its own voices.
Chatting with Jude
Conclusion: a detailed write-up of a conversation #
Where: Chat Screen → Conclusion under a chat
- Press Conclusion under a conversation in the menu.
- JudeMed.AI writes a Detailed Informational Conclusion based on Available Research from that conversation (this takes up to a minute). Jude leaves out your name and other identifying details, but the conclusion can include health information from the chat and your profile (for example conditions and medicines).
- To share it, choose how long the link works (7, 30 or 90 days; 30 is preset), press 🔗 Create shareable link and then Copy. ← Back to Dashboard returns to your chats.
Under Your shared conclusion links on the same page you see every link that still works: which chat it is from, until when it works and how often it was opened. Copy link copies it again; Stop sharing ends it at once for everyone.
- Important: anyone who has a shareable link can open that conclusion (no sign-in, email or PIN) until it expires or you stop sharing. Share it only with people you trust, and do not post it publicly. For your doctor, a shared report is better protected (email or PIN check).
- An expired or stopped link shows only "This shared conclusion could not be found". Deleting the chat, or your account, ends its links at once.
- In Research Mode conversations the conclusion carries a research disclaimer.
Chatting with Jude
Research Mode (Research plans and up) #
Where: Chat Screen → Research Mode button on a new chat
Research Mode is for clinicians, researchers and anyone who wants to explore a question more widely than a normal consultation: emerging research, competing hypotheses and off-label considerations.
- Start a new chat (+ New Chat). Research Mode can only be switched on while the conversation is still empty.
- Press the Research Mode button (double-helix icon) on that chat's card. The conversation is marked as a research conversation.
- Ask your question. Conclusions and shared links of this chat carry a separate research disclaimer.
Research Mode is included in the Research, NeraTex Controller, Clinical User and practitioner plans (see Plans & Billing). Its answers are exploratory and are not advice for your own care.
Your health logs
Logging readings from the chat #
Where: Chat Screen
- Tell Jude a reading in your own words, for example "I just measured my blood pressure: 124/79, pulse 70" or "I weigh 168".
- Jude prepares a Log Vital Reading card with the values and the date and time.
- Check it, correct a value if needed, and press Confirm & Save (or Cancel). Nothing is saved before that.
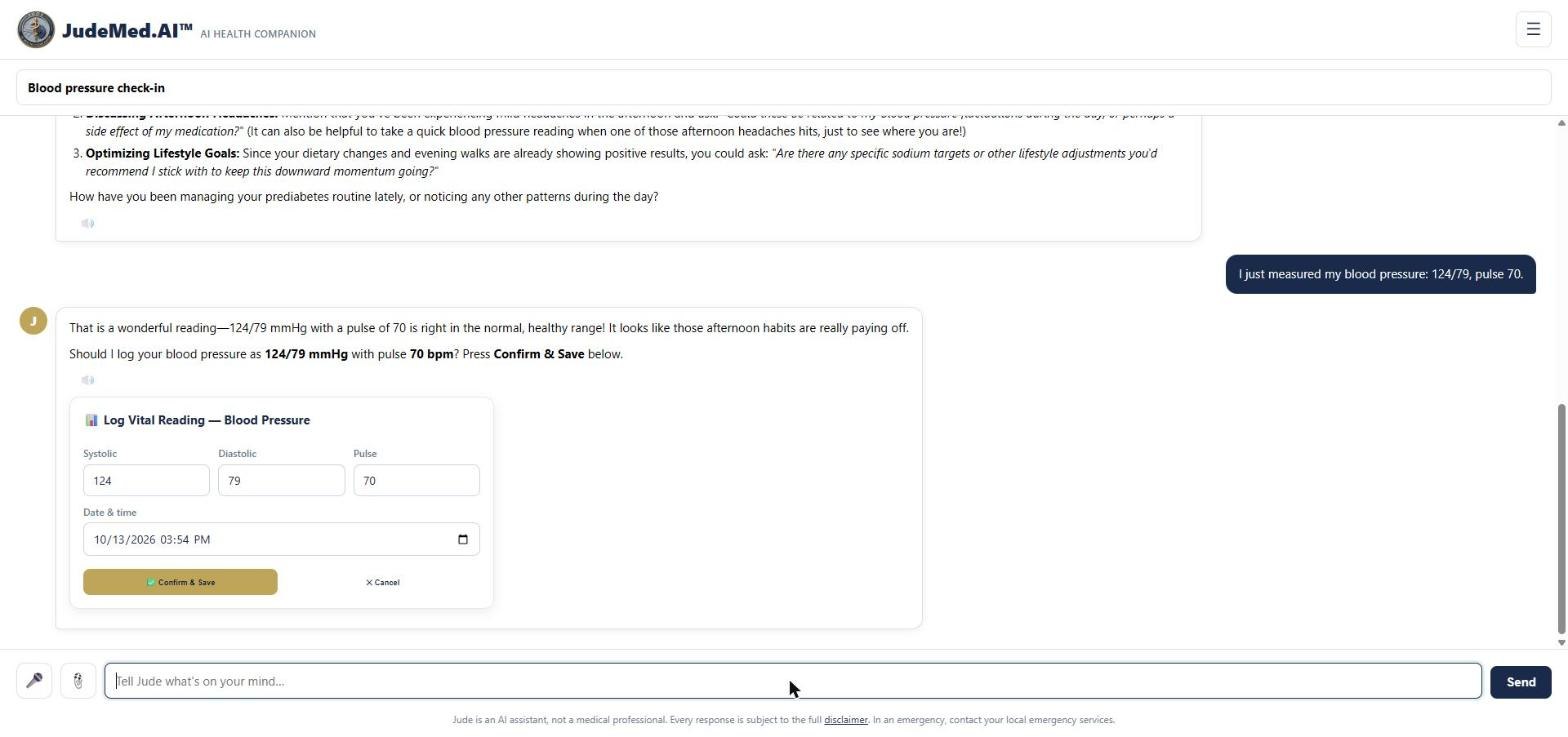
- Readings are logged in your units (see Locale & Units). If a value looks like the other unit ("240 lbs" while your unit is kg), JudeMed.AI asks first.
- A new weight also updates the weight on your Patient Data screen (and so your BMI).
- Medicines you say you took can be logged the same way (one card lists them all); they go into the Medication Log.
- Other changes to your records work the same way: when Jude suggests adding a medicine to your Medicine Cabinet, marking one as stopped, or adding an allergy or intolerance to your Health Profile, a card asks first. Press Yes to make the change or No to leave your records as they are. Nothing changes without your OK.
- In a chat about a child, confirmed logs are saved for that child.
Your health logs
My Logs: the overview #
Where: Menu → My Logs → All logs
- Open My Logs. The overview shows one tile per log, with the date of your last entry (or "no entries yet").
- Press a tile to open that log. ‹ All logs takes you back.
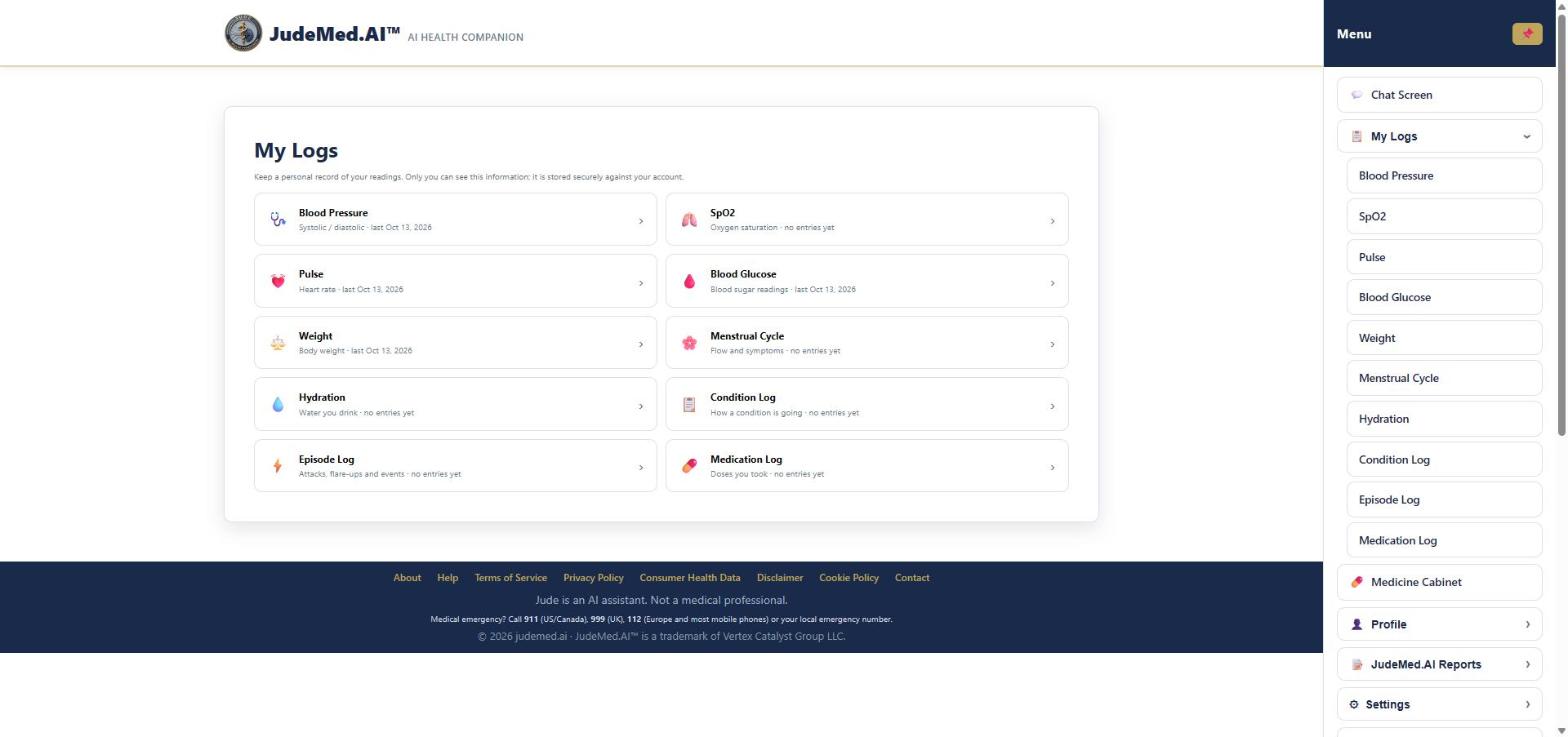
Every log page works the same way: the date and time are filled in with now (change them for an earlier reading), you enter the values and press Add Reading (or Add Entry / Log …). Your recent entries are listed below, newest first; Show All shows the full history and Delete removes one entry. Only you can see your logs.
| Log | What you record |
|---|---|
| Blood Pressure | Systolic / diastolic (mmHg) |
| SpO2 | Oxygen saturation (%) |
| Pulse | Beats per minute |
| Blood Glucose | In mmol/L or mg/dL (your setting) |
| Weight | In kg or lbs (your setting) |
| Menstrual Cycle | Flow, symptoms, notes; the cycle day is calculated |
| Hydration | Water in ml or fl oz (your setting), electrolytes |
| Condition Log | A condition, pain level 0-10, activity, notes |
| Episode Log | An event (e.g. dizziness), duration, severity |
| Medication Log | Medicines you took, dose, with or without a meal |
Readings from an Epic import (blood pressure, pulse, SpO2, weight, temperature) appear in these logs too. Your health summary report shows a monthly summary of your home readings.
Your health logs
Blood Pressure log #
Where: Menu → My Logs → Blood Pressure
- Check the date and time.
- Enter Systolic (mmHg) (the top number) and Diastolic (mmHg) (the bottom number).
- Press Add Reading. Log your pulse from the same measurement in the Pulse log, or tell Jude both at once in the chat.
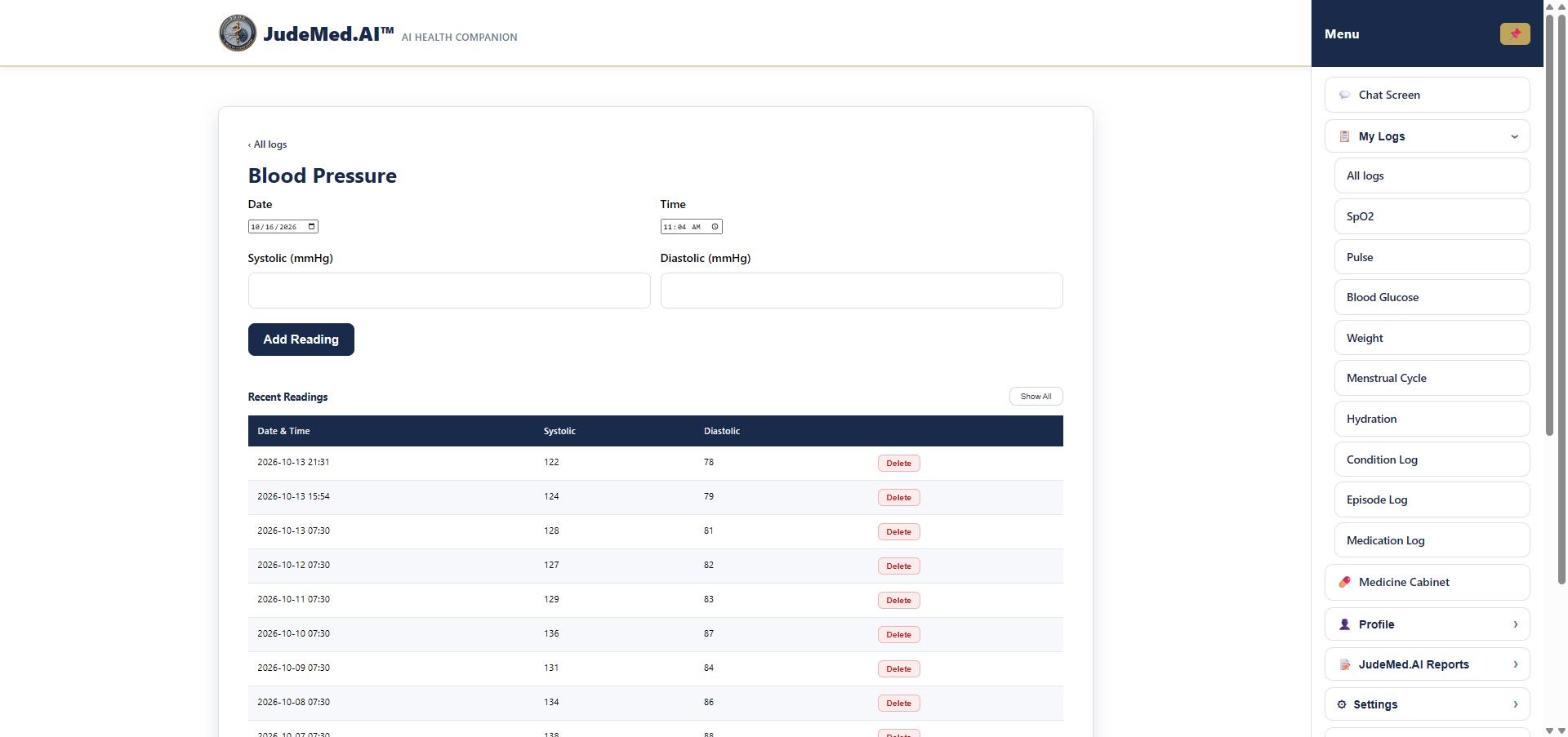
Tip: measure at the same times each day, seated and rested, and log every reading - your doctor sees the averages and ranges in your report.
Your health logs
SpO2 log (oxygen saturation) #
Where: Menu → My Logs → SpO2
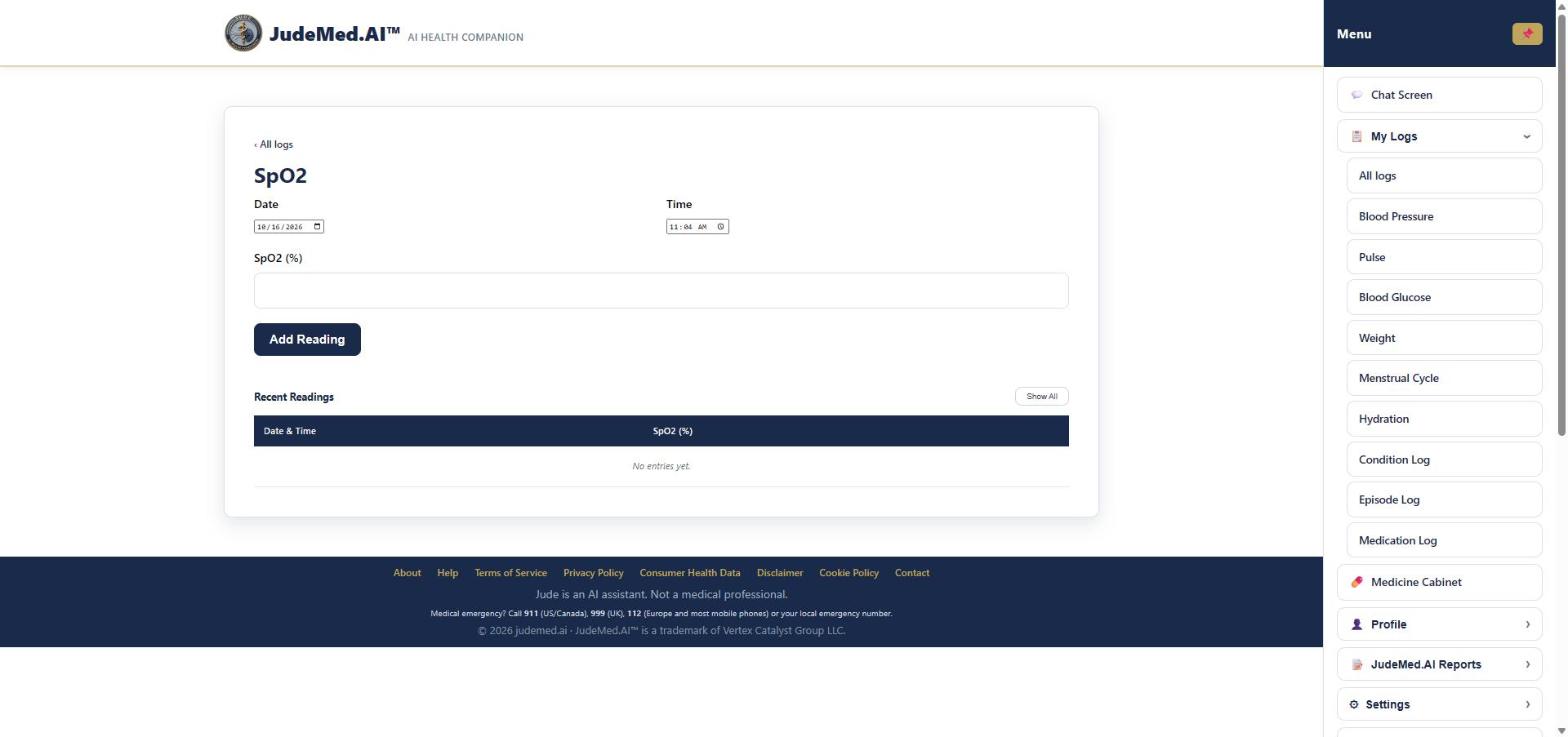
- Check the date and time, enter SpO2 (%) from your pulse oximeter and press Add Reading.
Your health logs
Pulse log #
Where: Menu → My Logs → Pulse
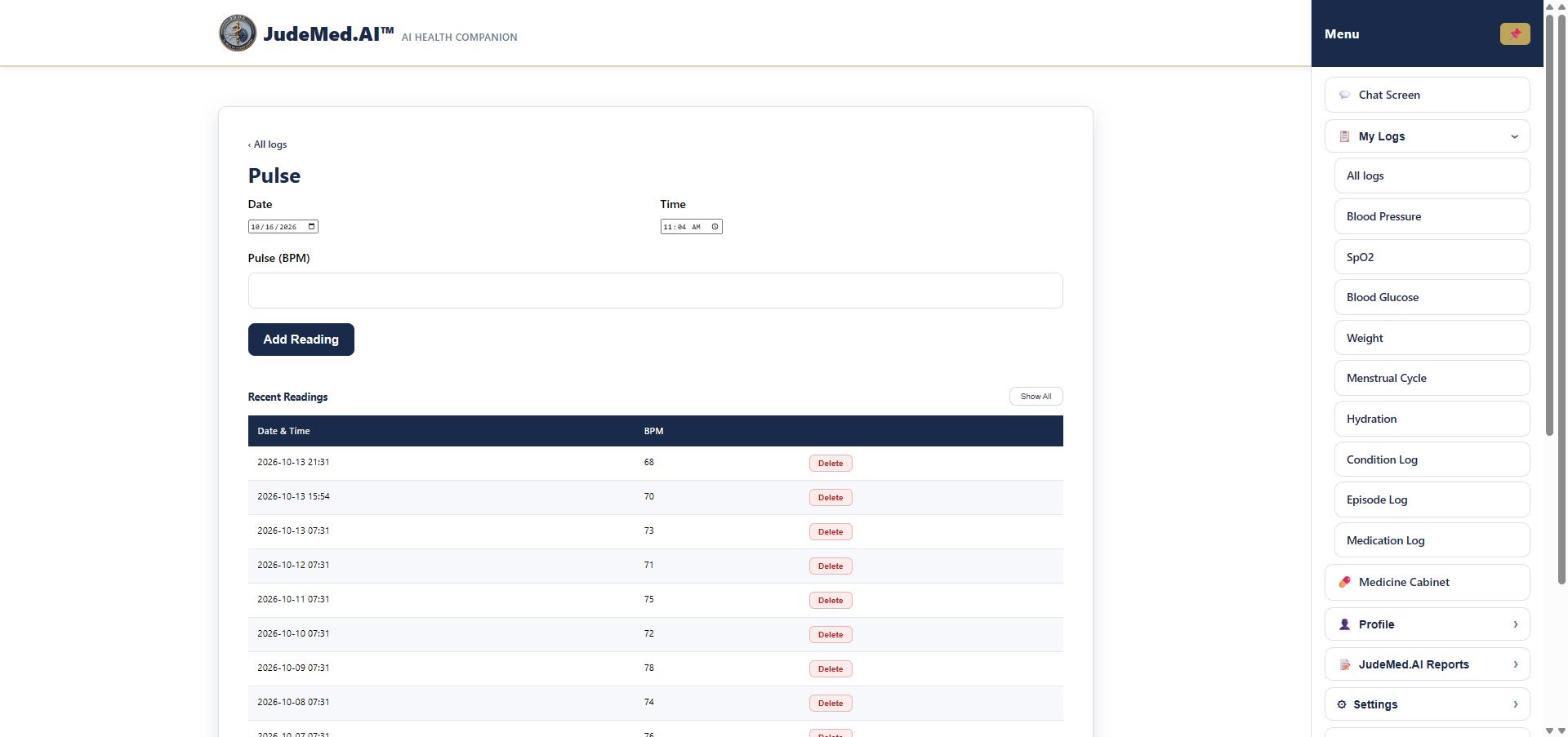
- Check the date and time, enter Pulse (BPM) (beats per minute) and press Add Reading.
Your health logs
Blood Glucose log #
Where: Menu → My Logs → Blood Glucose
- Check the date and time and enter the Reading. The Unit (mmol/L or mg/dL) is your setting; change it in Settings → Locale & Units.
- Press Add Reading.
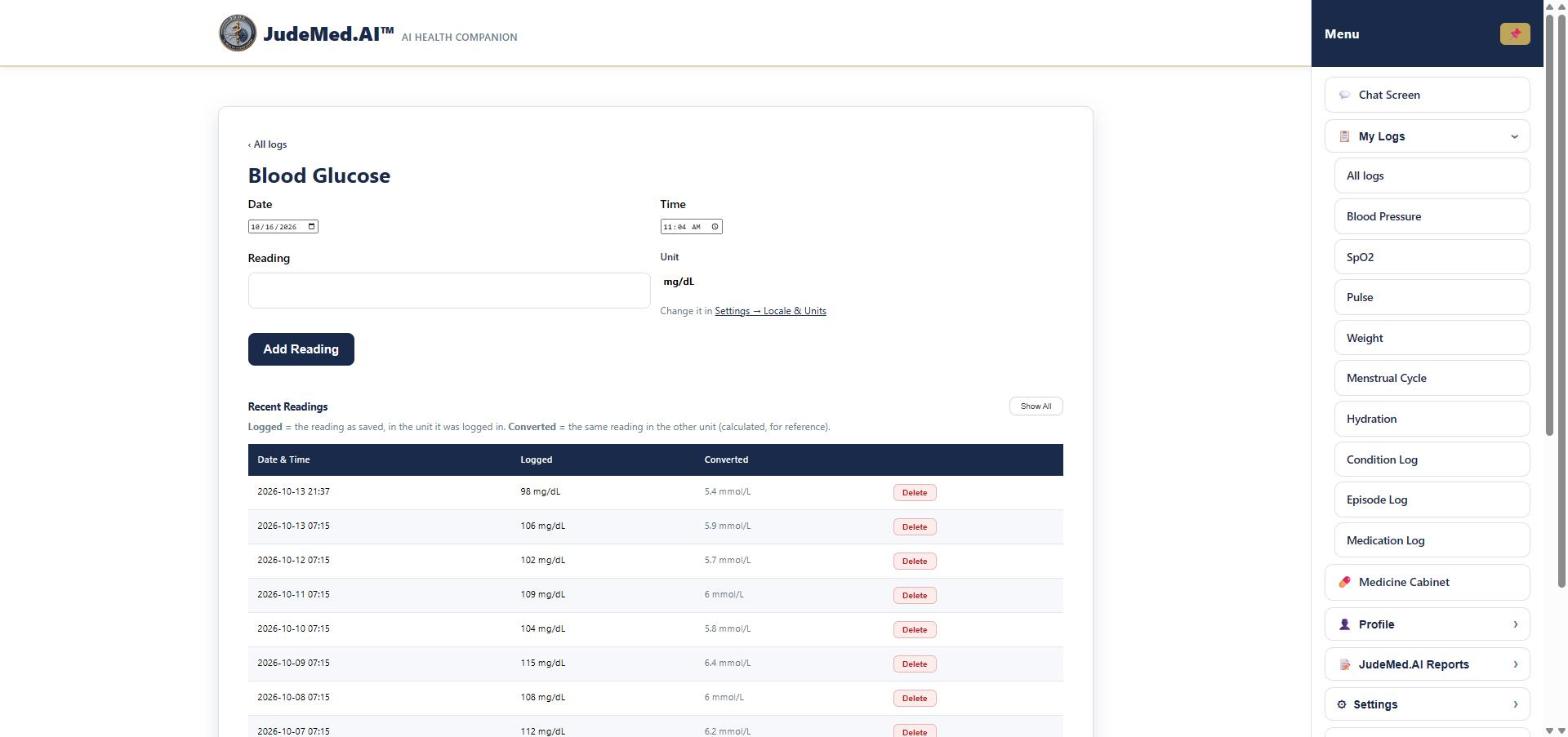
The history shows Logged (the reading as saved, in the unit it was logged in) and Converted (the same reading in the other unit, for reference). Tell Jude whether a reading was fasting, so the report can say so.
Your health logs
Weight log #
Where: Menu → My Logs → Weight
- Check the date and time, enter your Weight in your unit (kg or lbs) and press Add Reading.
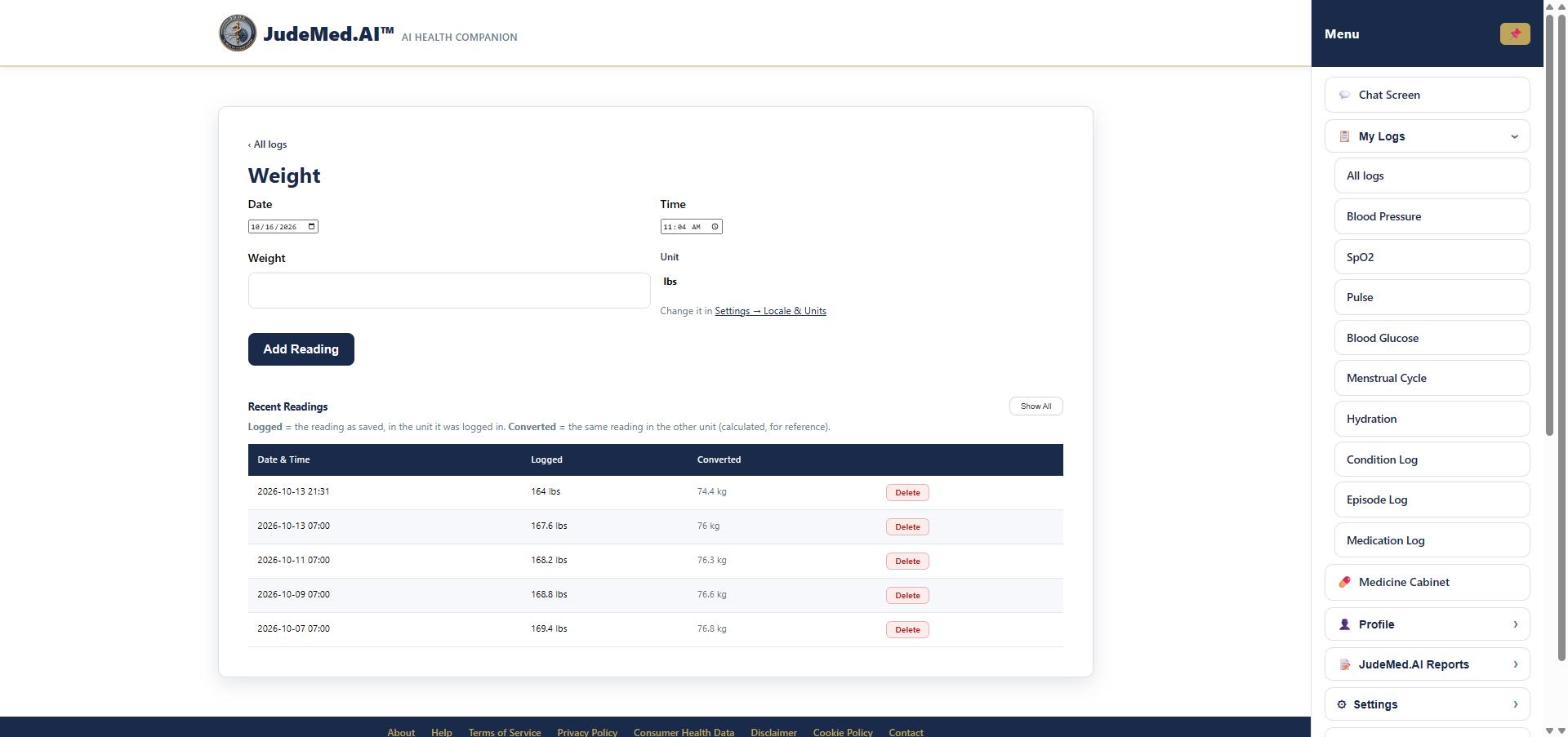
The newest weight is also your Patient Data weight, so your BMI stays up to date. The history shows Logged and Converted.
Your health logs
Menstrual Cycle log #
Where: Menu → My Logs → Menstrual Cycle
- The page shows a calendar of the year with your logged days; use ‹ › to change the year. Today is circled.
- Below the calendar choose the Date, the Flow Level (None, Spotting, Light, Medium, Heavy) and tick any Symptoms (cramps, headache, mood swings, bloating, fatigue, breast tenderness, acne, nausea). Add Notes if you like.
- Press Add Entry.
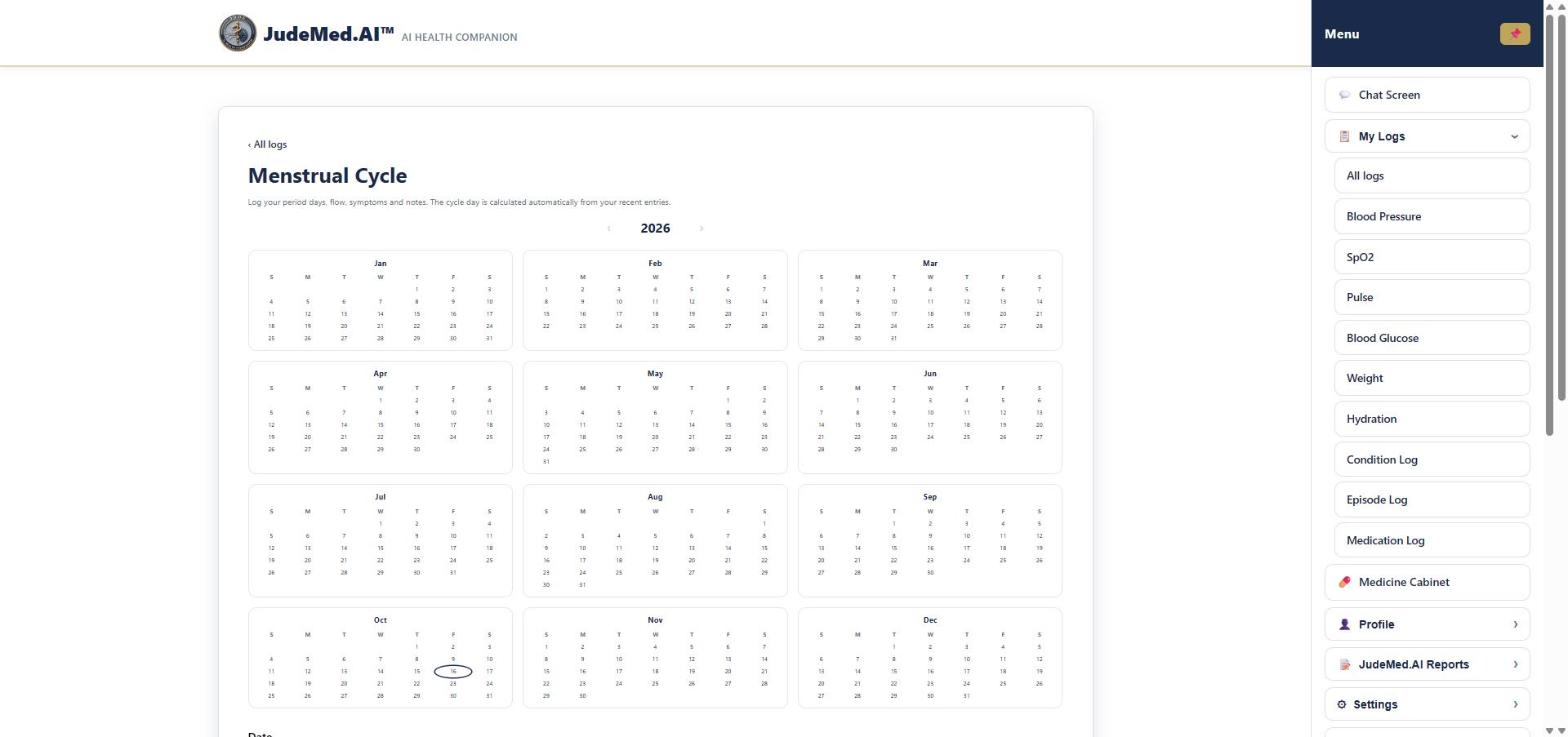
The cycle day is calculated automatically: day 1 is the first day of a period with real flow (light, medium or heavy). Spotting before that counts to the previous cycle, and days with gaps of up to two days still belong to the same period. If no period was logged in the 60 days before an entry, its cycle day stays empty. When you add or remove days, the cycle days of the other entries are worked out again. Jude only says which day of your period it is when a period day is logged for today or yesterday, or when you tell it in that chat. This log is not shown when your biological sex is set to male in Patient Data.
Your health logs
Hydration log #
Where: Menu → My Logs → Hydration
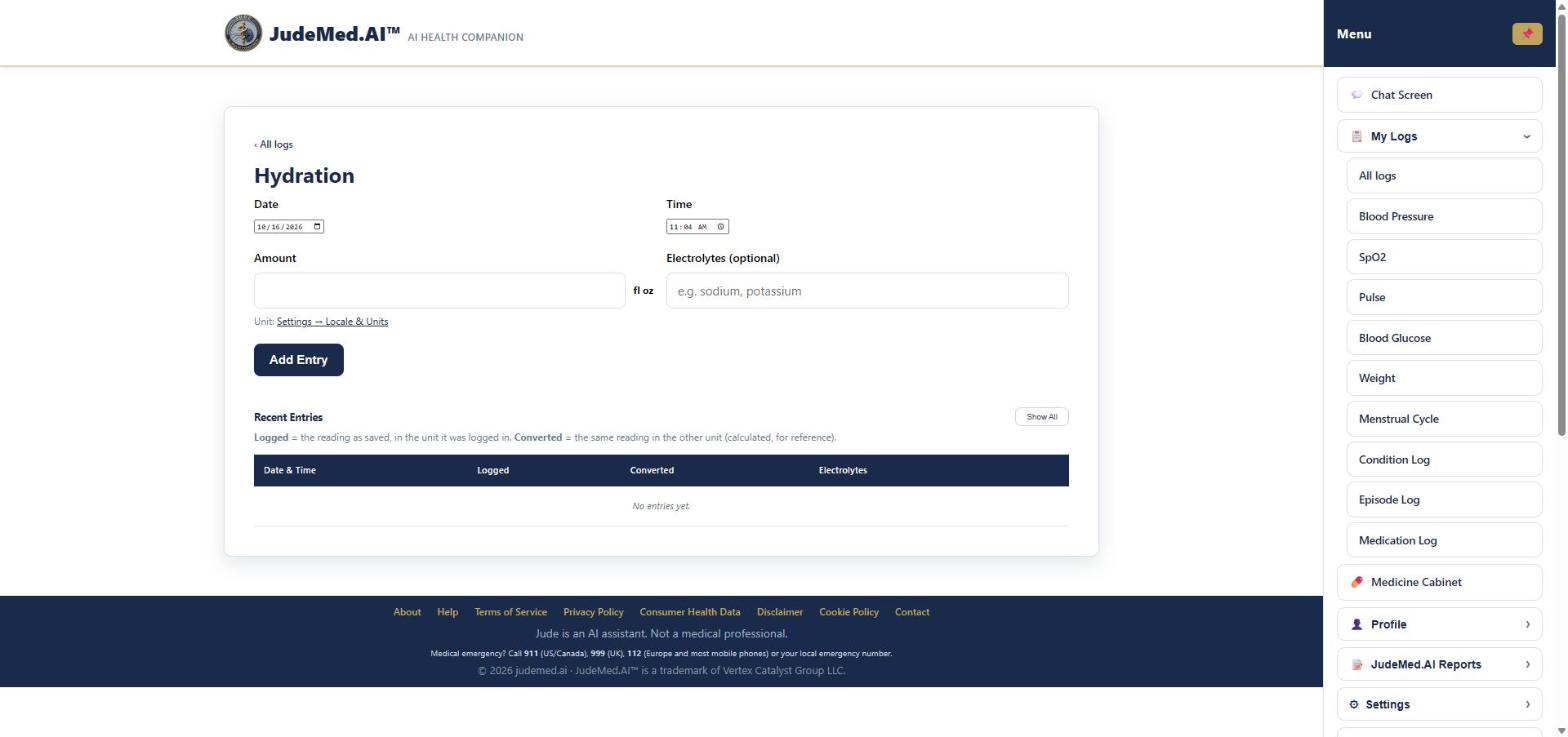
- Check the date and time and enter the Amount of water in your unit (ml or fl oz).
- Optionally note Electrolytes (for example sodium, potassium) and press Add Entry.
Your health logs
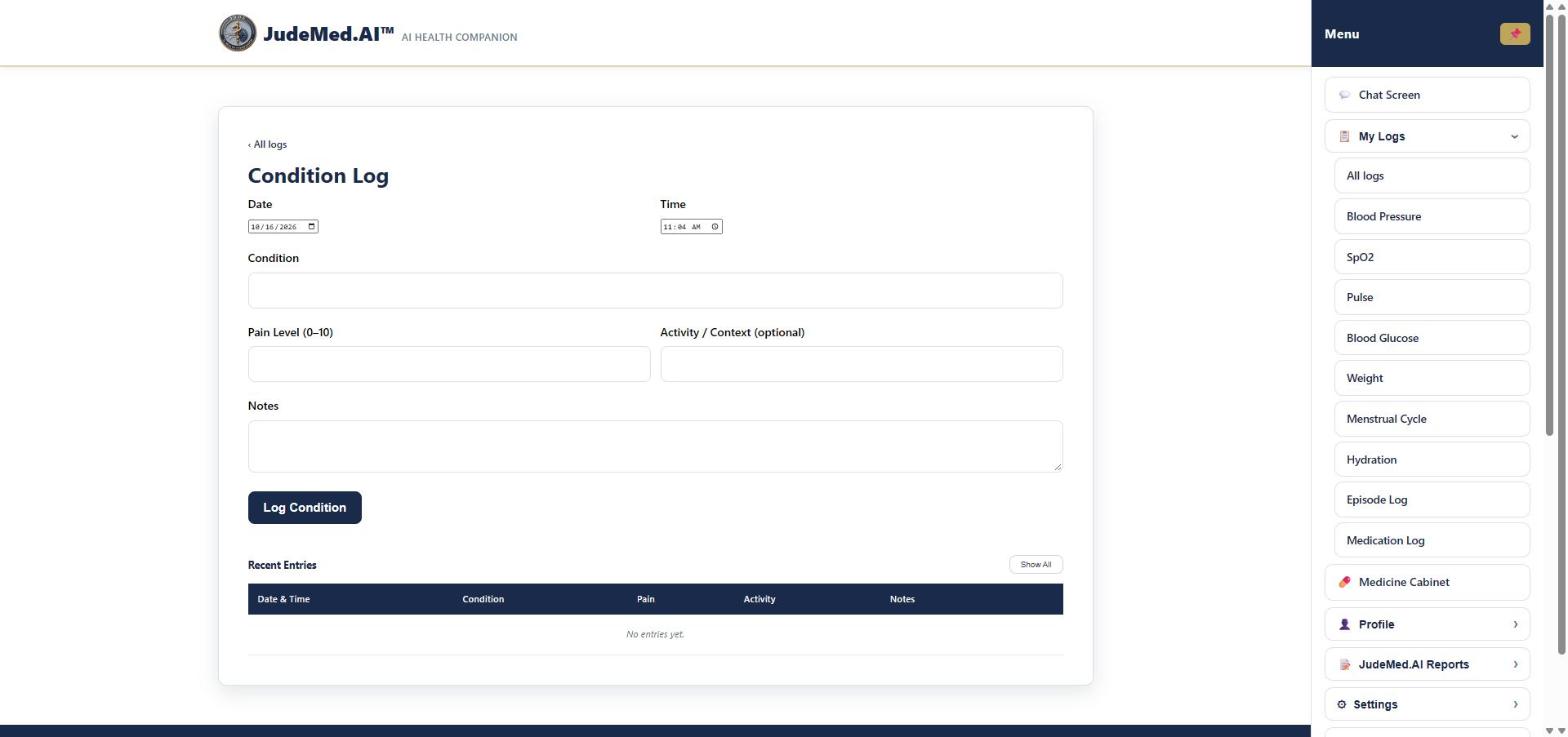
Condition Log #
Where: Menu → My Logs → Condition Log
Use it to follow how a condition is going over time (for example knee pain or eczema).
- Check the date and time and enter the Condition.
- Enter the Pain Level (0-10), what you were doing (Activity / Context, optional) and Notes.
- Press Log Condition.
Your health logs
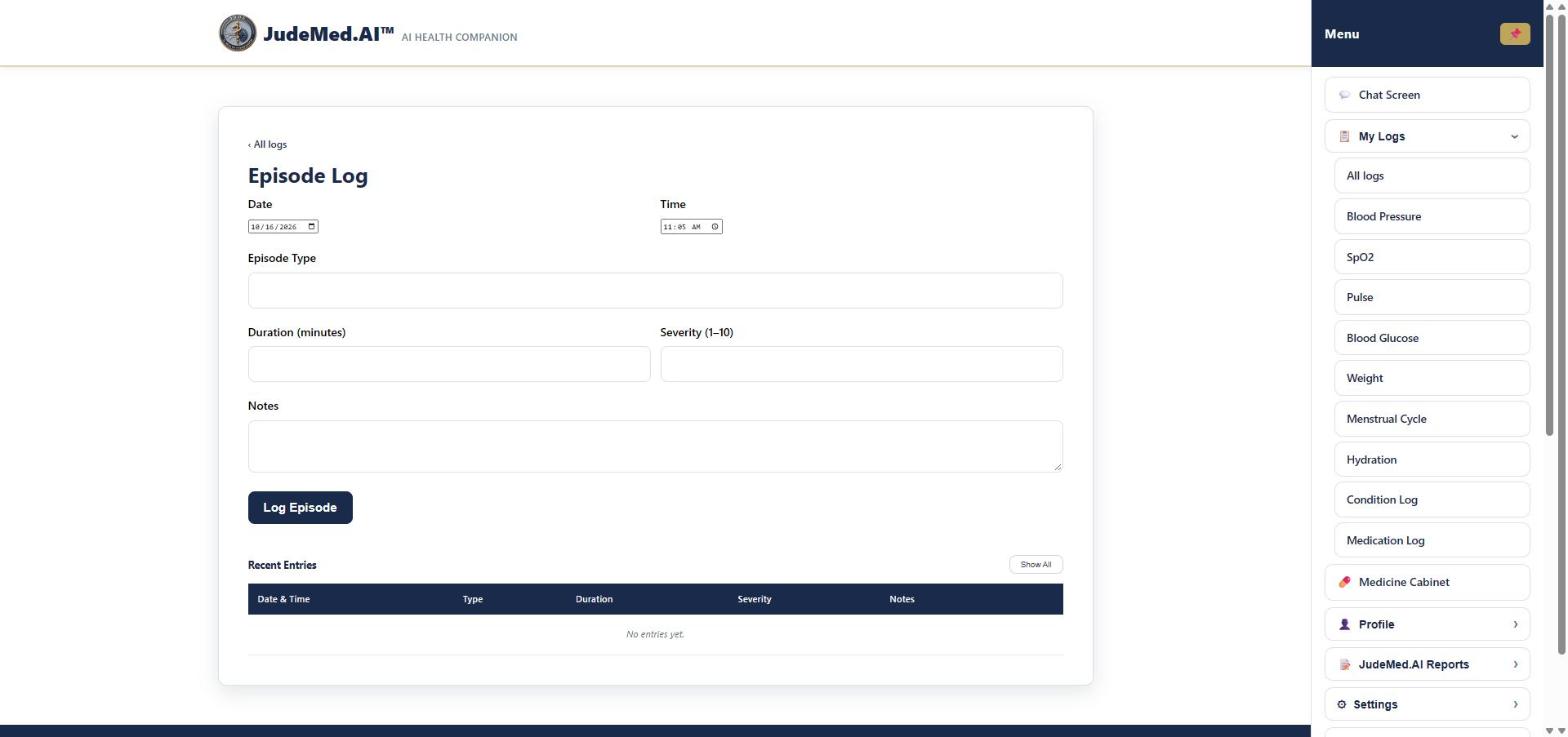
Episode Log #
Where: Menu → My Logs → Episode Log
For attacks, flare-ups and other events (for example a migraine, dizziness or palpitations).
- Check the date and time and enter the Episode Type.
- Enter the Duration (minutes), the Severity (1-10) and Notes (what happened before, what helped).
- Press Log Episode.
Your health logs
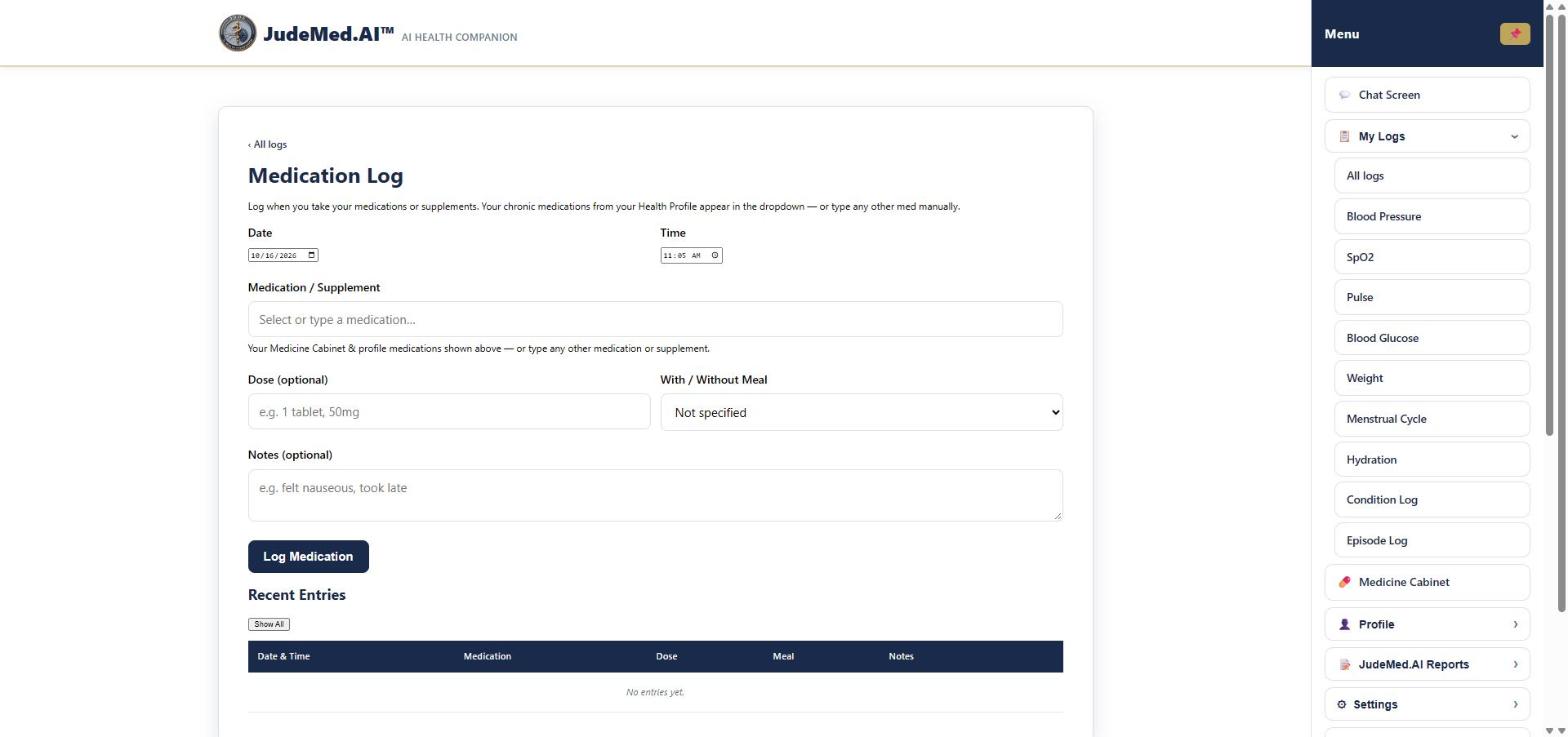
Medication Log (what you took) #
Where: Menu → My Logs → Medication Log
- Check the date and time.
- In Medication / Supplement pick from the list (your Medicine Cabinet and the medicines in your Medical History) or type any other name.
- Add the Dose (optional, e.g. 1 tablet, 50 mg), With / Without Meal and Notes, and press Log Medication.
The Medication Log is what counts as taken: your health summary lists the medicines you take or logged as taken, not everything in your cabinet.
A new prescription from your health system: when you log the first dose of a medicine that is prescribed in your imported records and not yet in your Medicine Cabinet, it is added there automatically as a Prescription (daily, or "as needed" when the directions say so), with who prescribed it and when. This works the same when you confirm a "taken" card in the chat. A prescription you never log is not added.
Your health logs
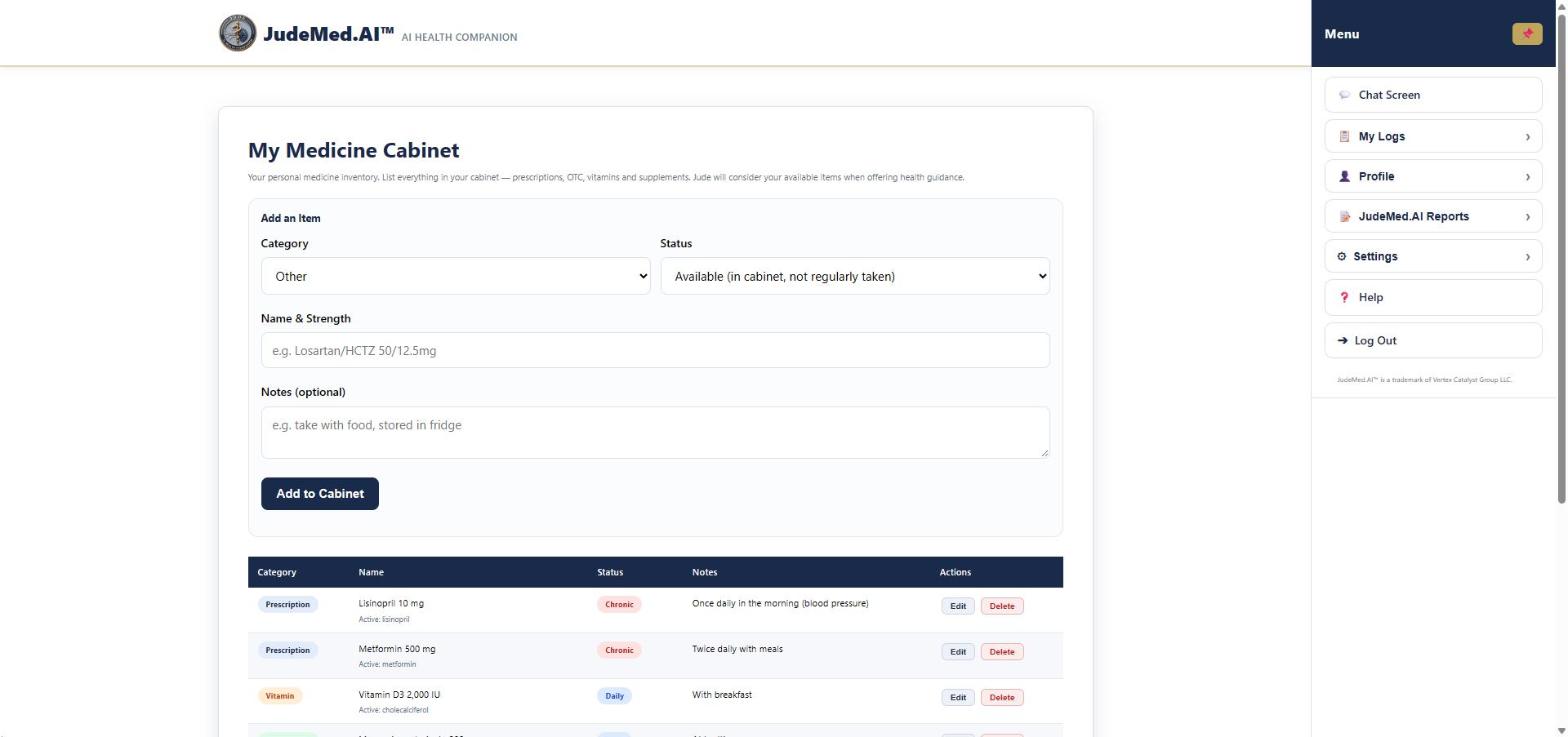
Medicine Cabinet #
Where: Menu → Medicine Cabinet
- Open Medicine Cabinet.
- Under Add an Item choose the Category (Prescription, OTC, Supplement, Vitamin, Herbal, Essential Oil, Other) and the Status, enter the Name & Strength (e.g. Losartan/HCTZ 50/12.5mg) and optional Notes, and press Add to Cabinet. Or tell Jude ("I started magnesium glycinate 400 mg at night") and confirm the card.
- Use Edit or Delete on an item to change it.
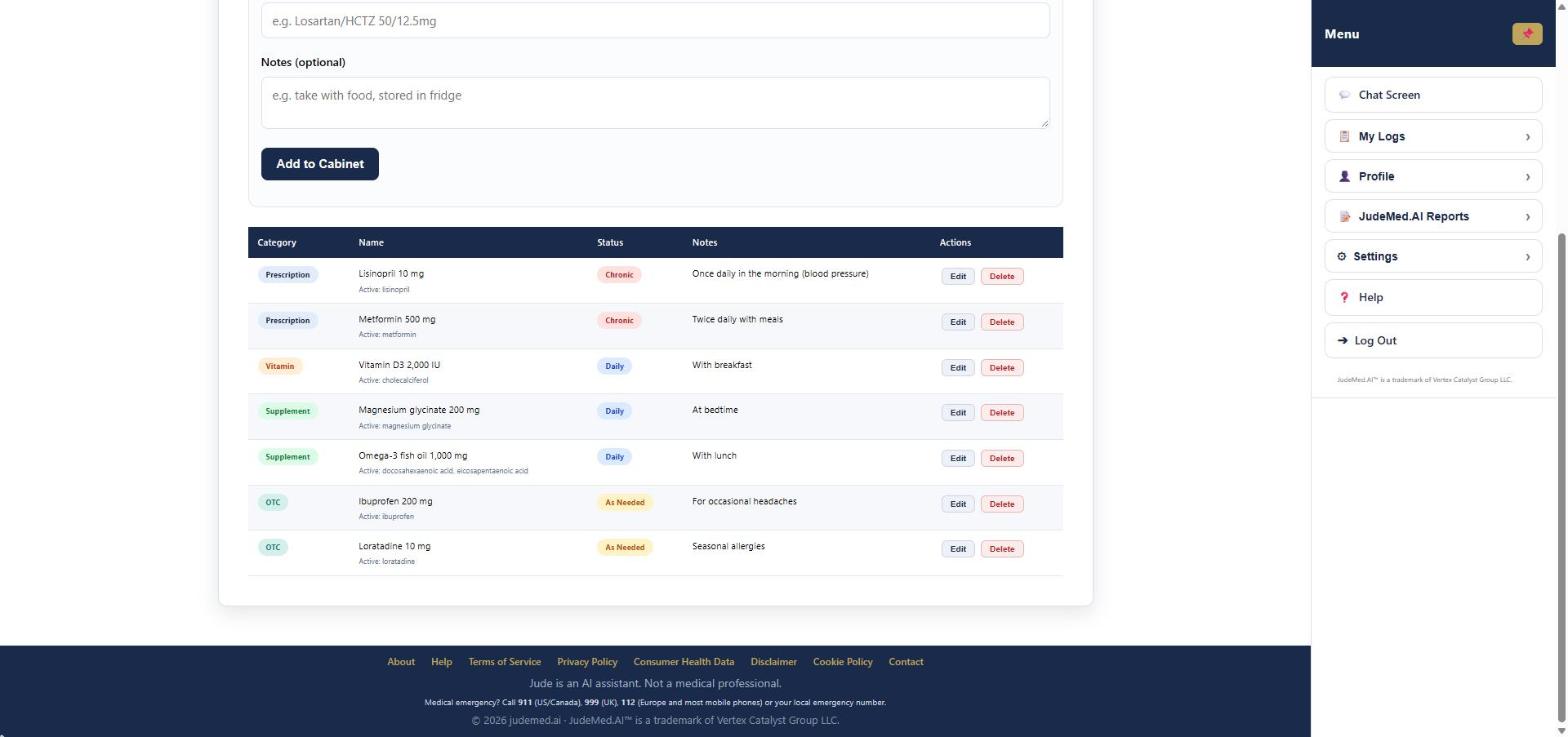
| Status | Meaning |
|---|---|
| Chronic | A long-term medicine you take |
| Daily / Weekly | How often you take it |
| As Needed | Only when needed (e.g. for a headache) |
| Available | In your cabinet, not regularly taken |
| Discontinued | You stopped it |
- Under each name you see its Active ingredients when JudeMed.AI knows them (see Medicine names).
- Being in the cabinet does not mean you take it: your health summary lists only medicines you take or logged as taken.
- A prescription from your imported records is added to the cabinet by itself when you log its first dose (see Medication Log). You can change or delete it like any other item.
- Duplicates: when the same medicine is in your cabinet twice (same active ingredient and strength, or one entry without a strength), the less complete entry shows Duplicate of "…". Removing this one is recommended with Remove this one (you are asked to confirm) or Keep both. Different strengths are different medicines and are never flagged.
- Stopped a medicine? Tell Jude ("I stopped colchicine") and it is marked discontinued.
- With Family Mode, a prescription can be marked as prescribed to one of your children.
Your health logs
Medicine names: registered names and ingredients #
Where: Menu → Medicine Cabinet
JudeMed.AI keeps a list of medicine names and checks them against public medicine registers (the South African SAHPRA register and the US FDA's openFDA database). Only the medicine name is looked up; none of your personal information is sent.
- Registered names. When you type a common spelling, JudeMed.AI uses the registered name, for example "adcodol" or "adco dol" becomes Adco-Dol. Jude uses that name in your chats and reports, so you also learn the correct spelling.
- Corrected from "…" · Keep my spelling. When a cabinet name was corrected, the note under it shows what you typed. Press Keep my spelling if you prefer your own name for it.
- Active ingredients. The ingredients from the register are shown under the name (Active: …), so Jude can recognise the same medicine under different brand names.
- The register lists this as … · Change / Keep. When the register gives another type (for example Vitamin instead of Supplement), press Change to use it or Keep to leave your choice.
The check runs each time you open the Medicine Cabinet. If a name cannot be found, nothing changes. Because names are matched by active ingredient, the same medicine entered twice under different names (for example a brand and its generic, at the same strength) is flagged as a duplicate.
Your profile
My Profile: the overview #
Where: Menu → Profile → All profile sections
- Open Profile. The overview has one button per section: Patient Data, Medical History, Family, Upload Results & Reports, Import Medical Records and NeraTex Controller (see Link a NeraTex Controller).
- Press a section to open it; ‹ All profile sections takes you back.
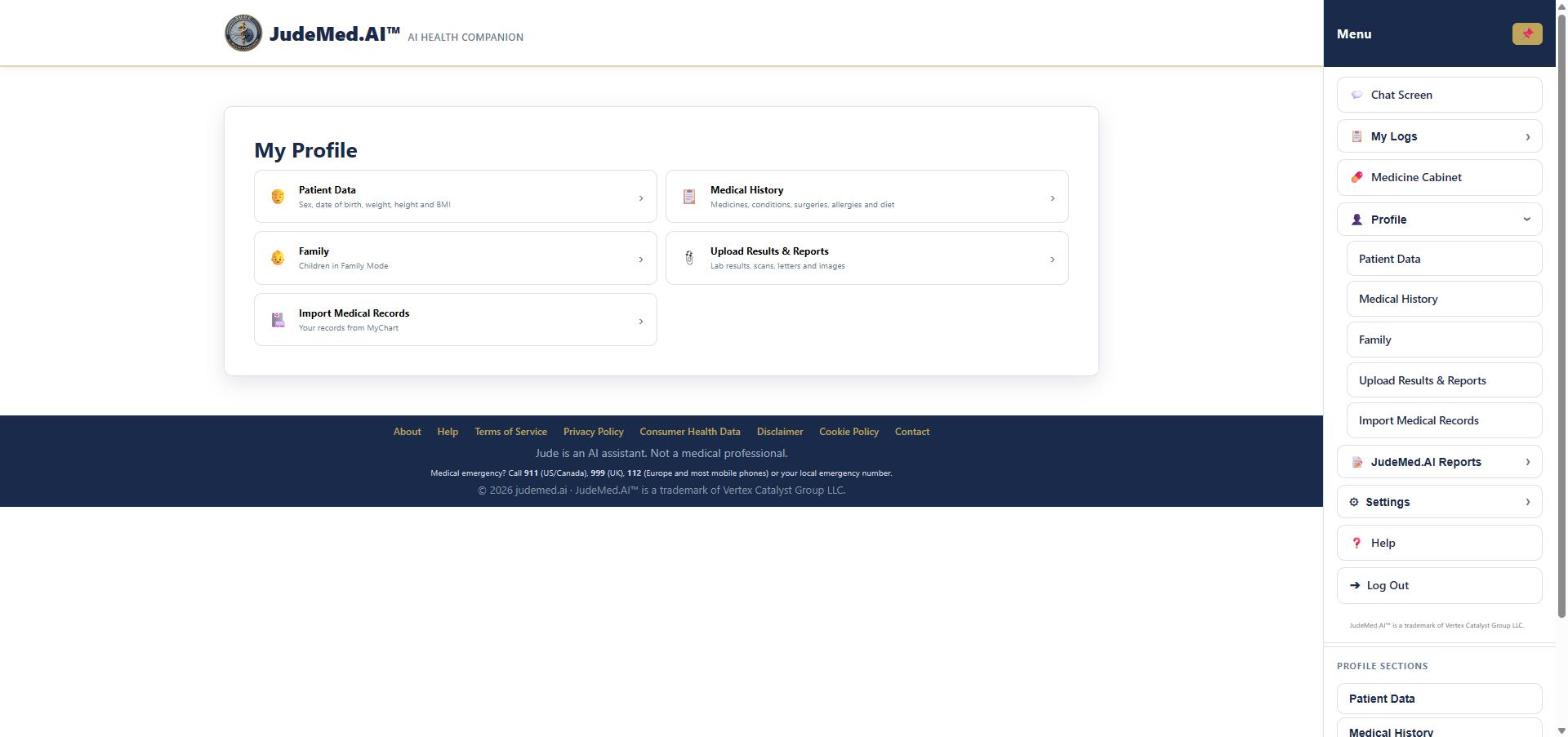
Your profile is shared with Jude only in chats where you switch it on (see What Jude can see). Leave any field blank that does not apply.
Your profile
Patient Data #
Where: Menu → Profile → Patient Data
- Open Profile → Patient Data.
- Fill in your biological sex, date of birth (optional, for your age in reports), weight and height in your units. Your BMI is calculated and shown with its category.
- Press Save Patient Data.
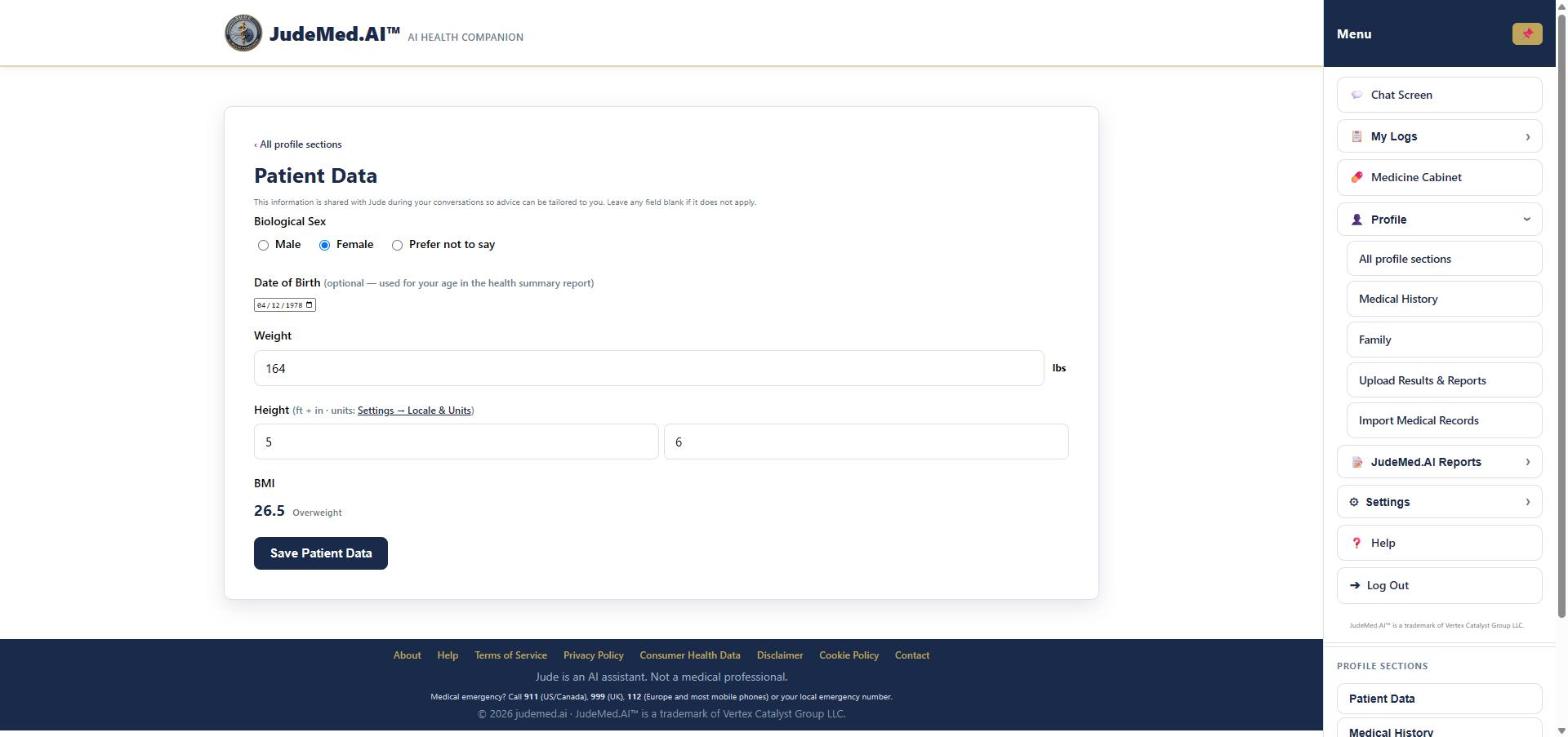
Your weight is kept up to date automatically: a newer weight logged in the chat or in My Logs, or from an Epic import, replaces it. An Epic height is used only when your height is empty or was measured in the last 12 months. Jude uses this information only in chats where Medical History access is on.
Your profile
Medical History #
Where: Menu → Profile → Medical History
- Open Profile → Medical History.
- Fill in what applies, one item per line: Chronic Medications, Medical Conditions, Past Surgeries & Injuries, Known Allergies, Dietary Habits, dietary requirements or restrictions, and other health notes. Leave the rest blank.
- Press Save Medical History.
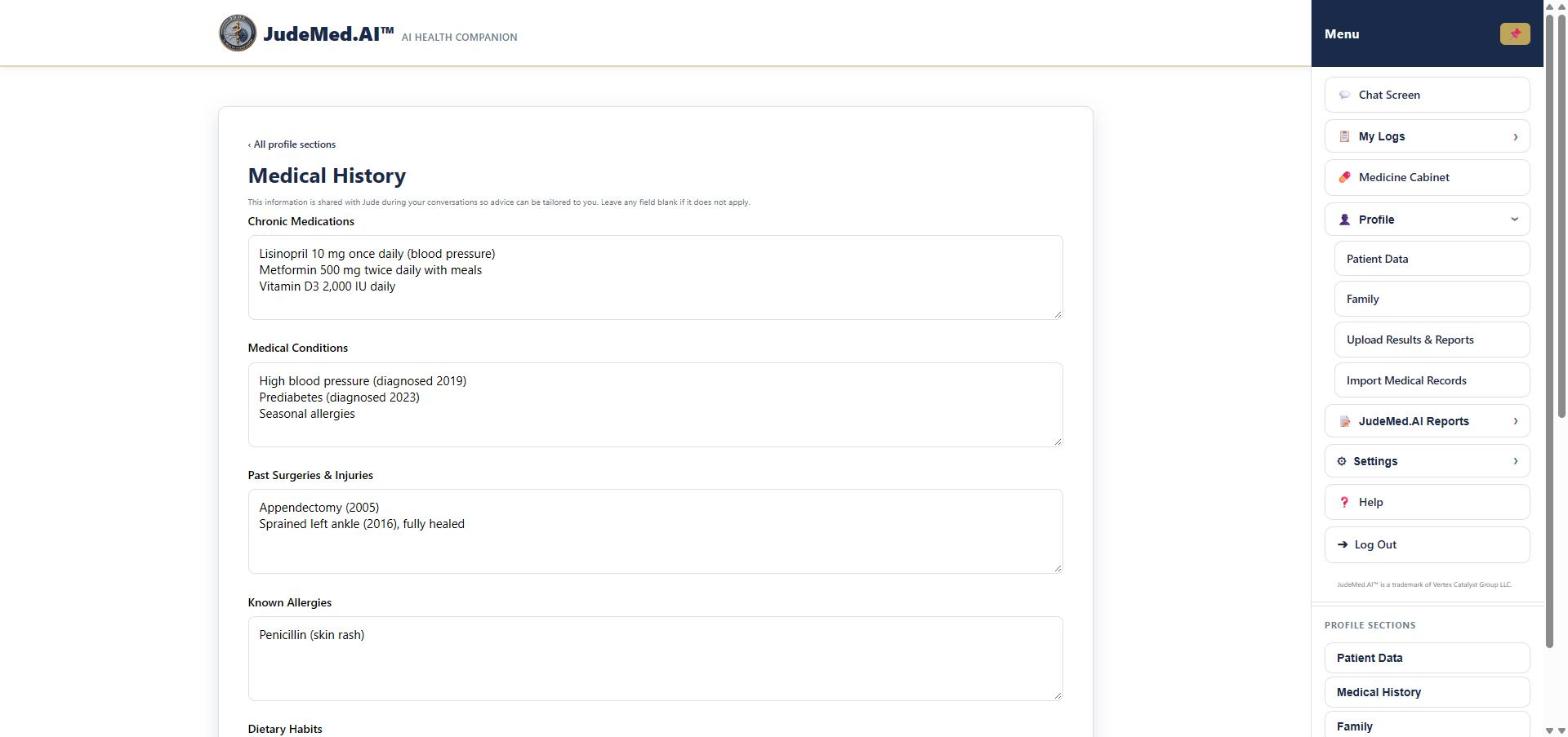
Jude uses it only in chats where Medical History access is on. Your chronic medications also appear in the list of the Medication Log.
Your profile
Family Mode: children in your care #
Where: Menu → Profile → Family
- Open Profile → Family and press + Add Child. Enter the name, date of birth, sex and notes (allergies, conditions), and save. You can add up to 5 children; each card shows the age, sex and date of birth, with Edit and Delete.
- Start a new chat (
/new, then/topic Lily - earache). Press ⚙ Settings under that chat in the menu and set Chat Subject to the child. A label with the child's name (for example 👶 Lily) appears under the chat title. - Ask your question as the parent. Jude tailors its guidance to the child's age and details, and logs you confirm in that chat are saved for the child.
- To make a report about the child, choose JudeMed.AI Reports → Generate Report and pick the child.
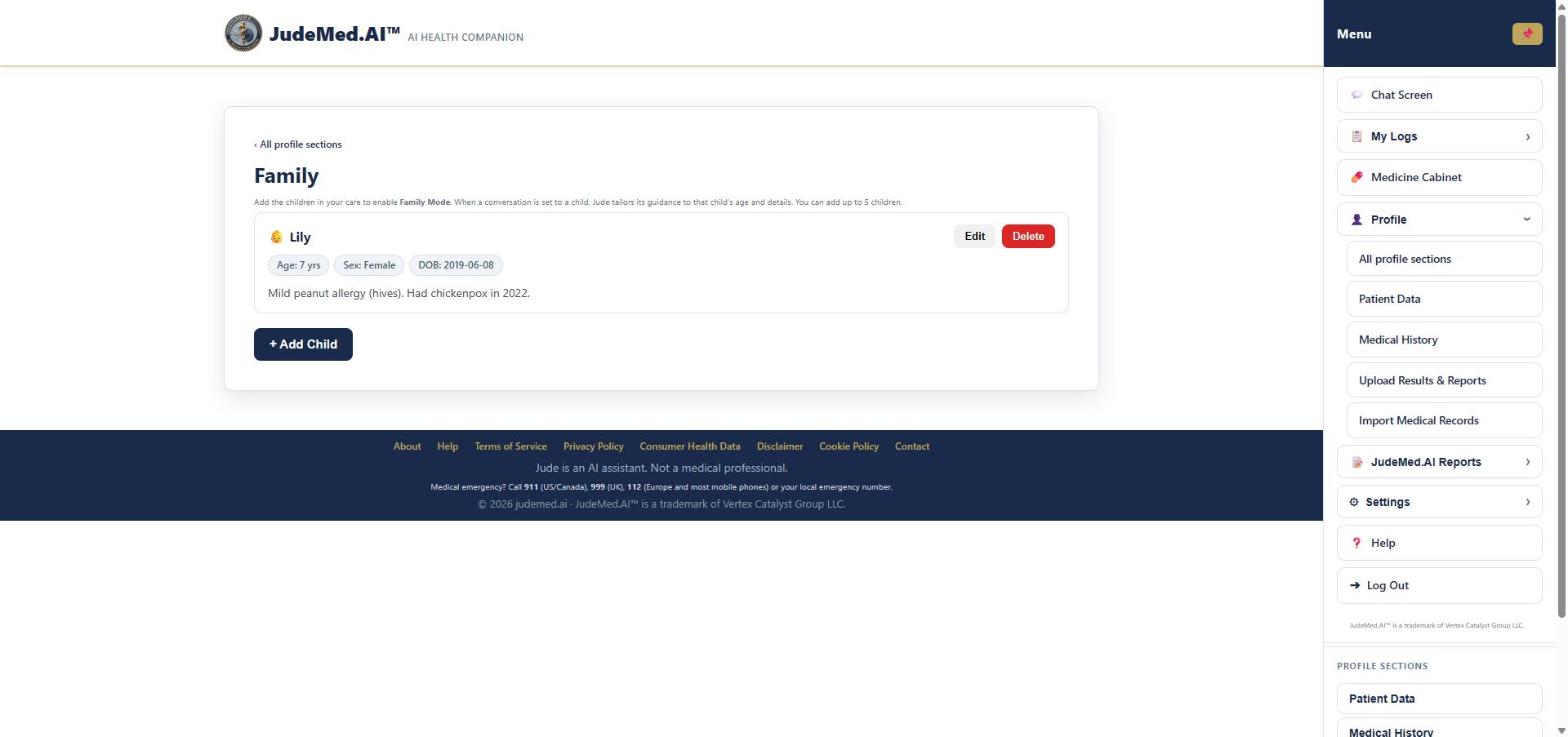
You are responsible for the children you add: add only children in your care (see the Terms of Service).
Your profile
Upload Results & Reports (documents and images) #
Where: Menu → Profile → Upload Results & Reports, or 📎 in the chat
- Open Profile → Upload Results & Reports (or press 📎 in a chat).
- Press Choose File: lab results, letters, prescriptions, scans or medical images such as X-rays (PDF, PNG, JPG or WebP, max 10 MB). + Add another file adds more files to the same upload.
- Add a Label if you like (for example "Blood test March 2024") and press Upload.
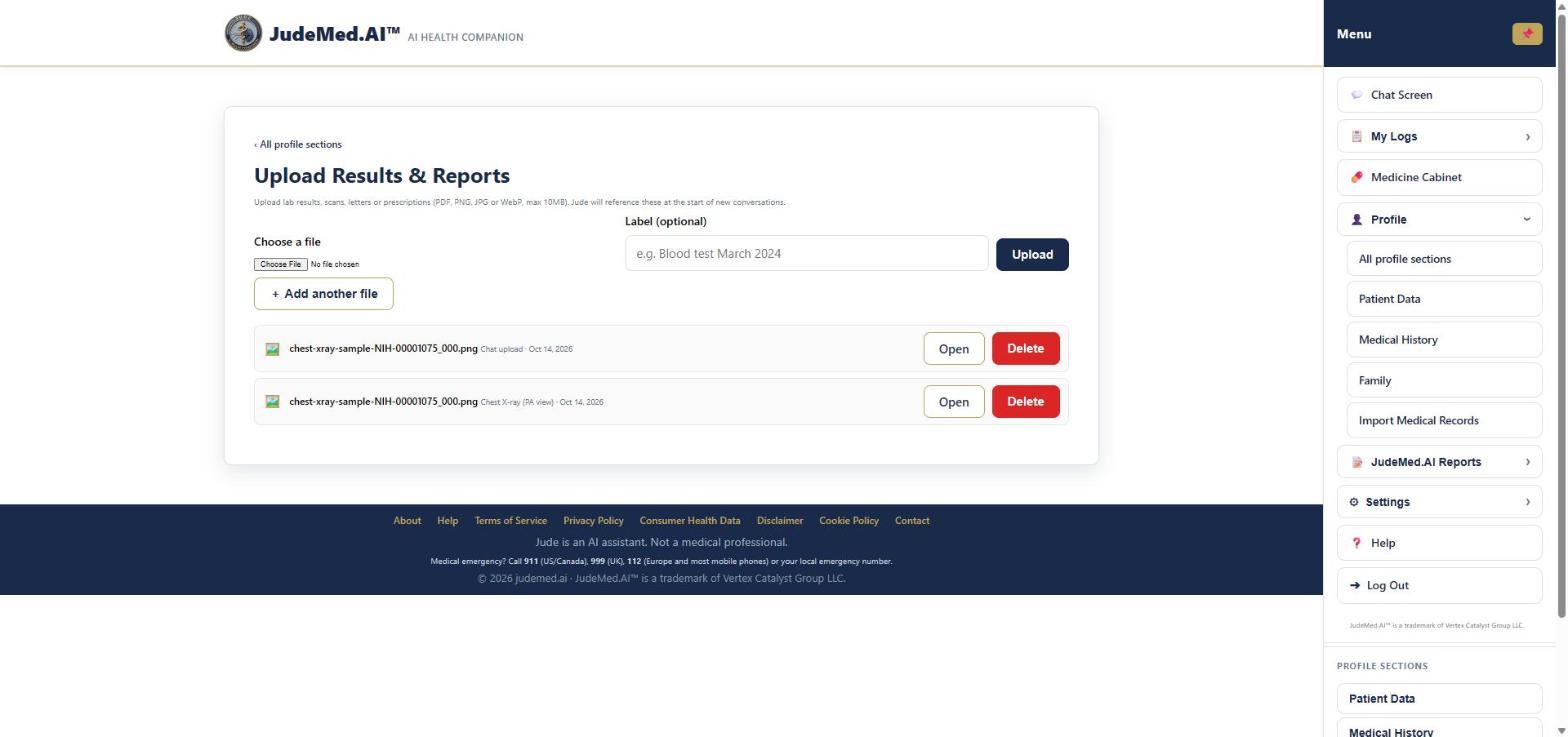
- JudeMed.AI writes a short summary of each document. Jude uses your uploads in chats where Report Uploads access is on, and in your health summary report.
- With many uploads, JudeMed.AI also keeps a combined summary of every 10 uploads, so older documents stay in view. Ask Jude to leave a document out if you don't want it used.
- Open shows a document in a new browser tab (PDF or image), for example to check a letterhead or a value. Only you can open your documents, and only while you are signed in: there is no public link, the document is not saved in the browser's cache, and each opening is recorded in your account's access log.
- Type
/uploadin a chat to see the list. Delete removes a document at any time.
The sample chest X-ray in these screenshots comes from the public, de-identified NIH Clinical Center ChestX-ray dataset (nihcc.app.box.com/v/ChestXray-NIHCC; Wang X. et al., ChestX-ray8, IEEE CVPR 2017). It is not the demo patient's own image.
Your profile
Import Medical Records (MyChart / Epic) #
Where: Menu → Profile → Import Medical Records
If your health system uses Epic MyChart, you can bring your own records into JudeMed.AI so Jude can explain them and include them in your summaries.
- Open Profile → Import Medical Records. Under Your health system type part of its name in the filter box and select it in the list.
- Press Connect. Your health system's own MyChart sign-in page opens. JudeMed.AI never sees your MyChart password.
- Sign in. MyChart shows what JudeMed.AI has said about how it handles your data; press Continue.
- Choose what to share (all categories are ticked) and allow read-only access. You return to JudeMed.AI and the import runs.
- Your records appear by category; open a category to see the items.
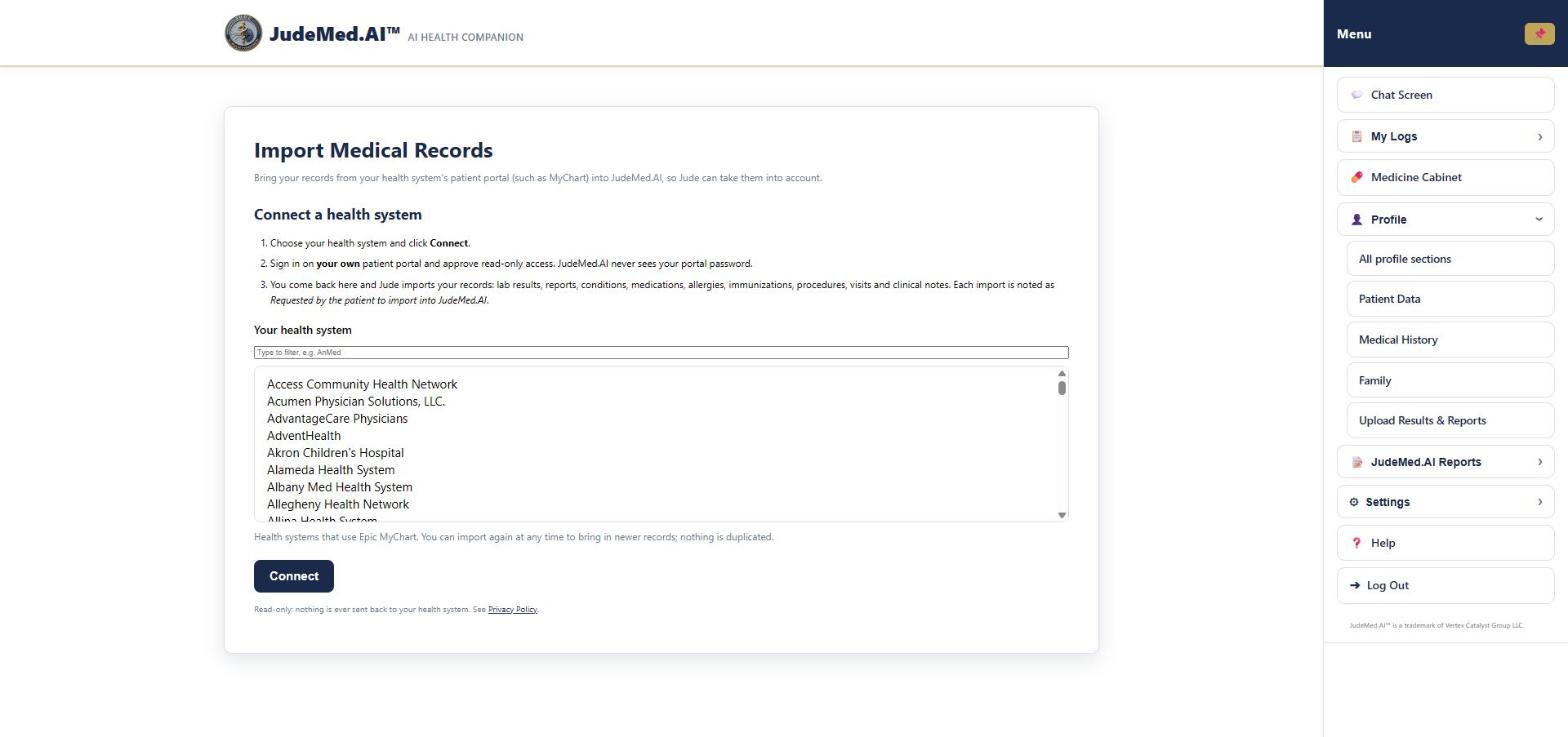
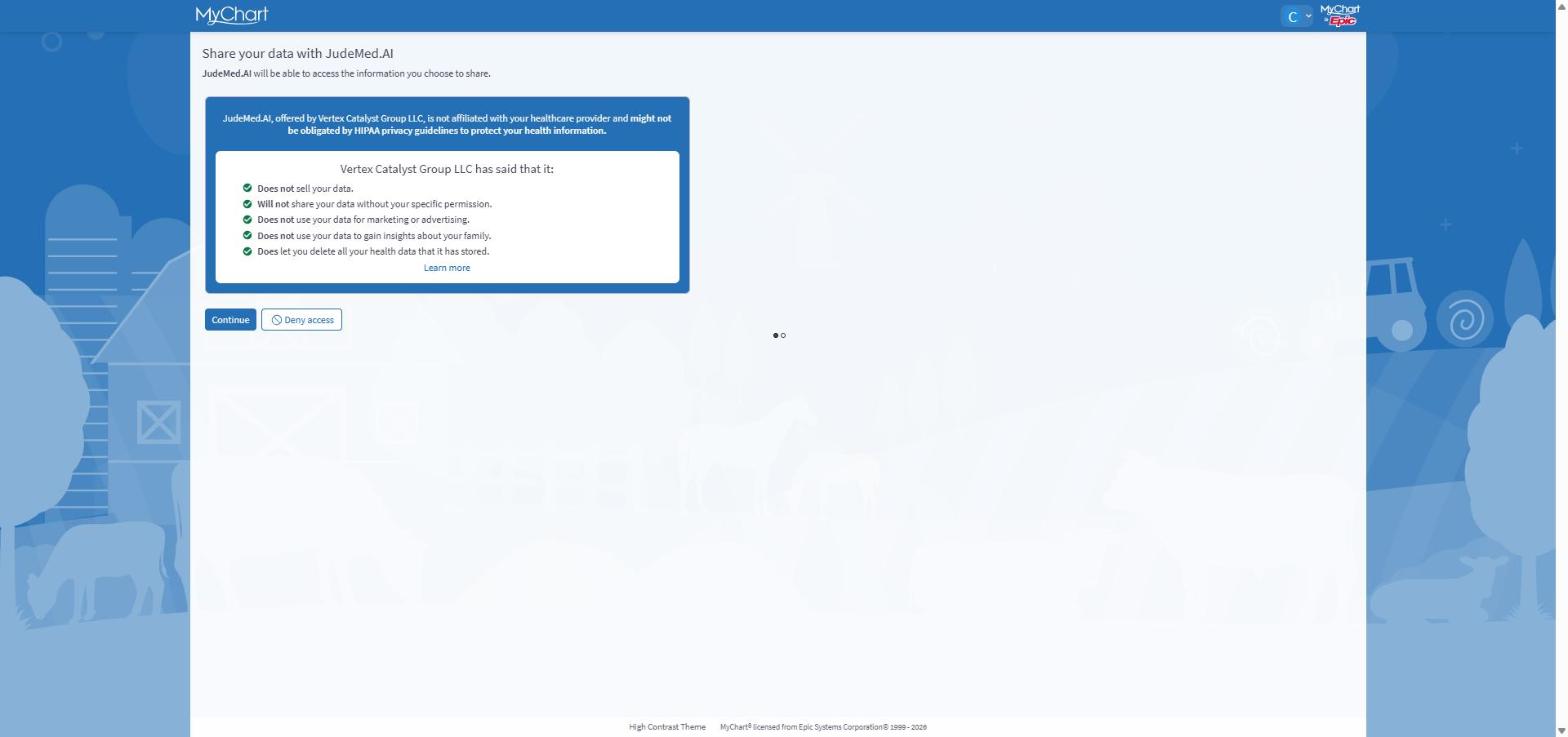
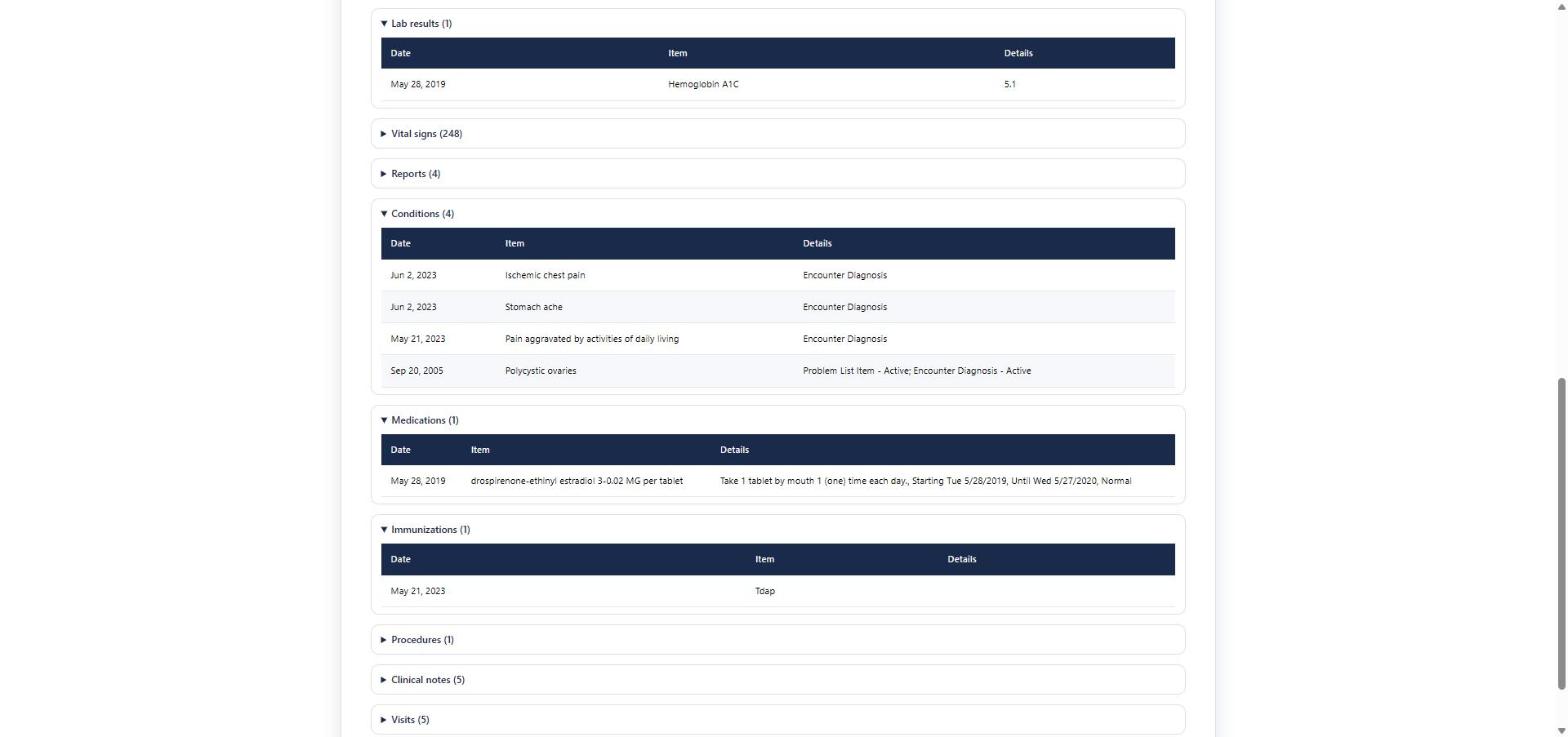
What is imported (what your health system has released to you in MyChart): lab results and vital signs, results reports, problems and diagnoses, medications, allergies, immunizations, procedures, clinical notes and visits. Vital signs also go into My Logs, and a newer weight or height updates your Patient Data.
- Read-only: nothing is ever written back to your health system.
- One-time access: the access lasts only for that import. To refresh, import again; nothing is duplicated.
- More than one health system: you can import from each one (for example your hospital and an urgent care). Every record keeps its own source, and Jude and your reports name the right health system for each result. A medicine another clinic only recorded at your visit (marked "Historical Med" in its records) is not counted as a new prescription from that clinic; the original prescription is used.
- Your control: delete an import (with its records and log readings) at any time. Jude uses imported records only in chats where Report Uploads access is on.
- Each import is noted in your account as "Requested by the patient to import into JudeMed.AI".
Details: Privacy Policy (imported records).
Health summary reports
Generating a health summary for your doctor #
Where: Menu → JudeMed.AI Reports → Generate Report
- Choose JudeMed.AI Reports → Generate Report (with Family Mode: choose whom it is about).
- The page shows JudeMed.AI is preparing your health summary… with the current step. It takes a few minutes because all your conversations, uploads and logs are read. You can leave the page; the report is saved under Historical Reports.
- When it is ready, use ⬇ Download PDF, 🖨 Print, 📤 Share or 🔗 Copy Link at the top.
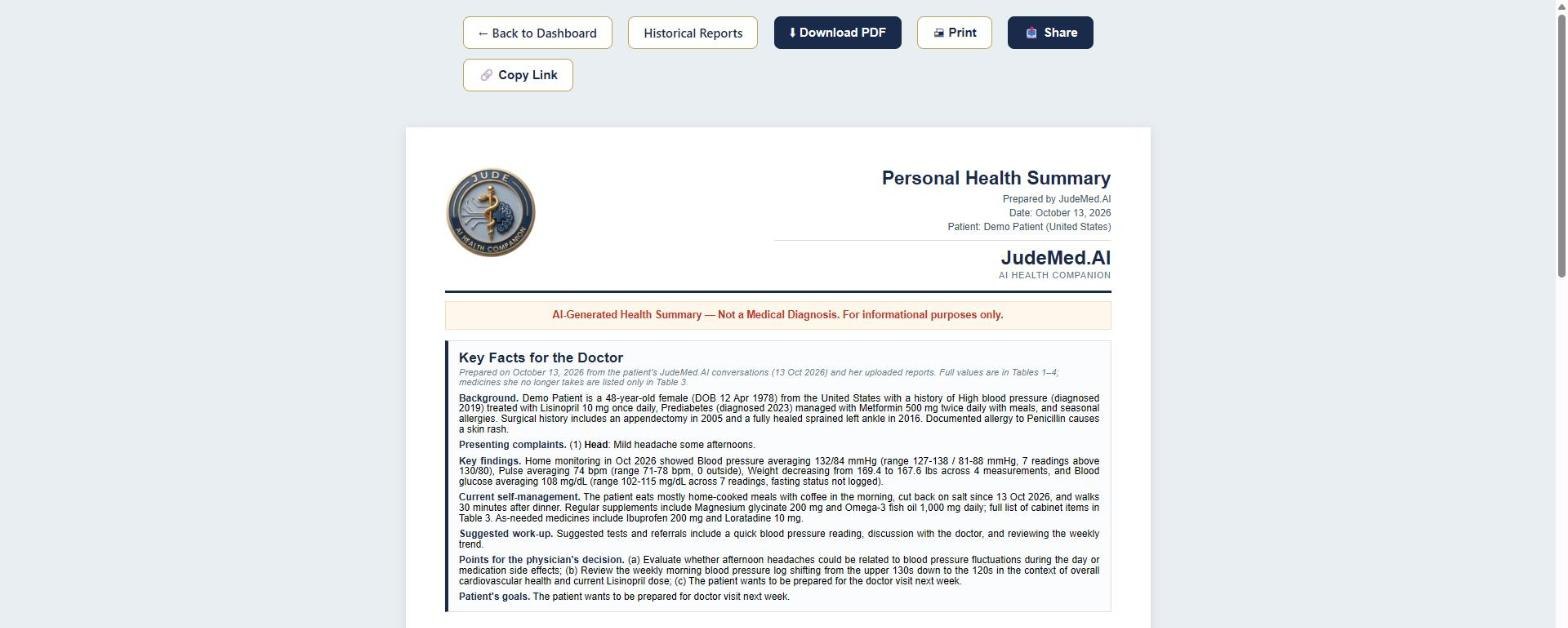
What is in the Personal Health Summary
- Key Facts for the Doctor - one page your doctor can read in a minute: background, presenting complaints, key findings, current self-management, suggested work-up, points for the doctor's decision and your goals. The self-management part (eating pattern and the daily, discussed-in-chat, as-needed and avoid lists - an item you only asked Jude about is "discussed in chat", never "planned") is taken from Table 3, and dates on this page follow your test results, so page 1 and the tables always agree.
- Table 1 - Topics to discuss per symptom - per body area: how you described it, the condition names JudeMed.AI used (only conditions confirmed in your records, or ones you asked about) and what they mean. Conditions your imported health records list as active, or that were recorded at a visit in the last 120 days, are always included, with the record they come from.
- Table 2 - Tests to discuss with the doctor, and why, and a checklist for your visit, sorted by kind (blood tests, imaging, heart, referrals, things to check at home). Every test Jude suggested in the last 60 days is listed; treatment options (such as injections or PEMF sessions) are not tests and are not listed there.
- The medicines and supplements you take (by registered name), with medicines you stopped listed separately. Medicines you told Jude you take, or take only when needed, are always listed, and your allergies and intolerances from your profile and imported records are always under Avoid. If you asked Jude never to mention a medicine again, it stays out of your reports - but a new prescription from your health system dated after your request is always listed, because your doctor needs to see it.
- Your current eating pattern as you last described it in the chat. If your work days and days off differ (for example a shift), both are shown; working hours are never taken as your eating times.
- Your test results (the last three results of each test when there are several, also when labs name the test differently) and a monthly summary of your home readings.
It is AI-generated health information for your doctor, not a diagnosis.
Health summary reports
Historical Reports #
Where: Menu → JudeMed.AI Reports → Historical Reports
- Open JudeMed.AI Reports → Historical Reports: every report you generated, newest first, with the date and time in your time zone, whom it is about and its status (Ready, or still being prepared).
- Use Open, Share, Copy Link, PDF or Delete.
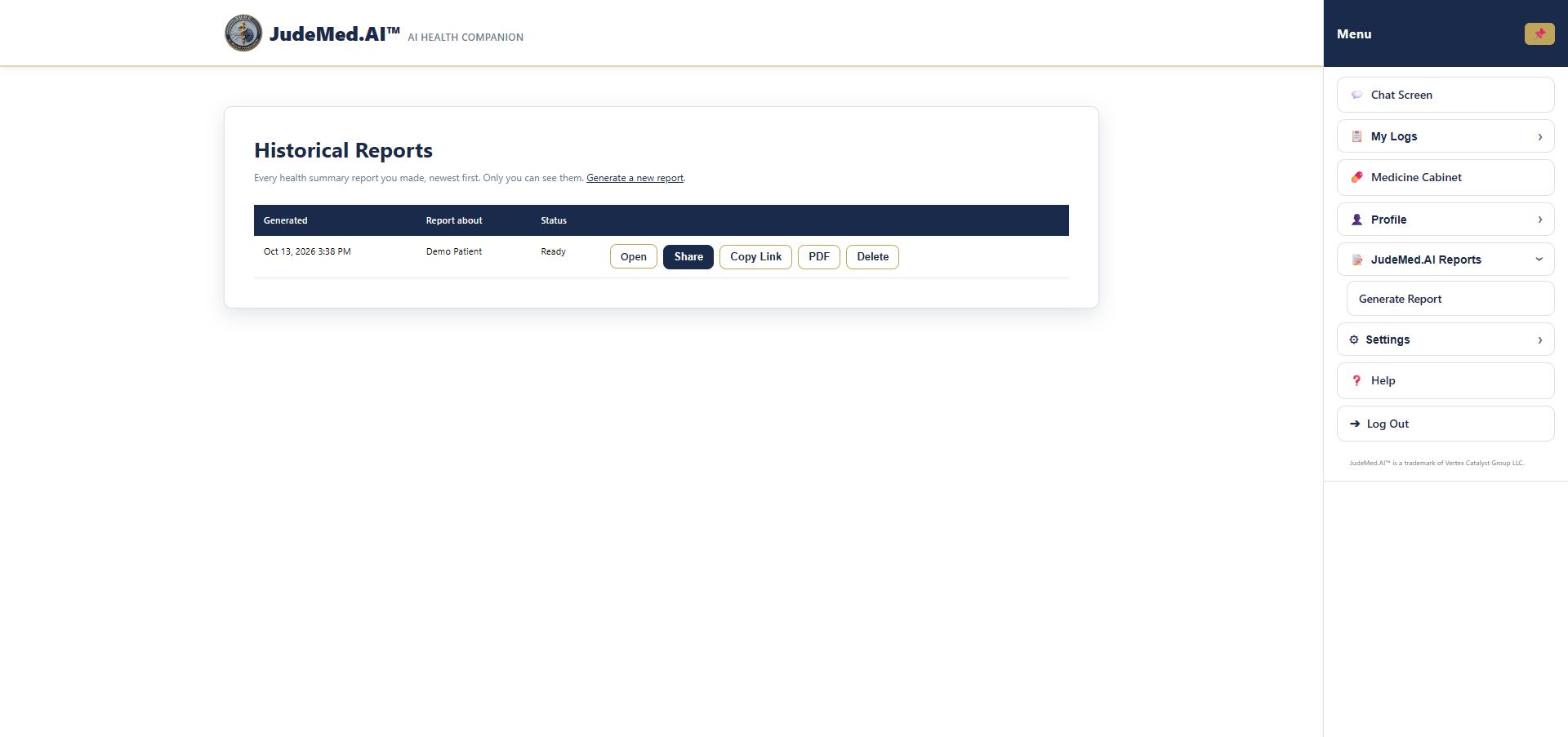
Deleting a report is permanent: it is erased completely and cannot be restored, and any sharing links for it stop working.
Health summary reports
Sharing a report with your doctor #
Where: Historical Reports or a report → Share / Copy Link
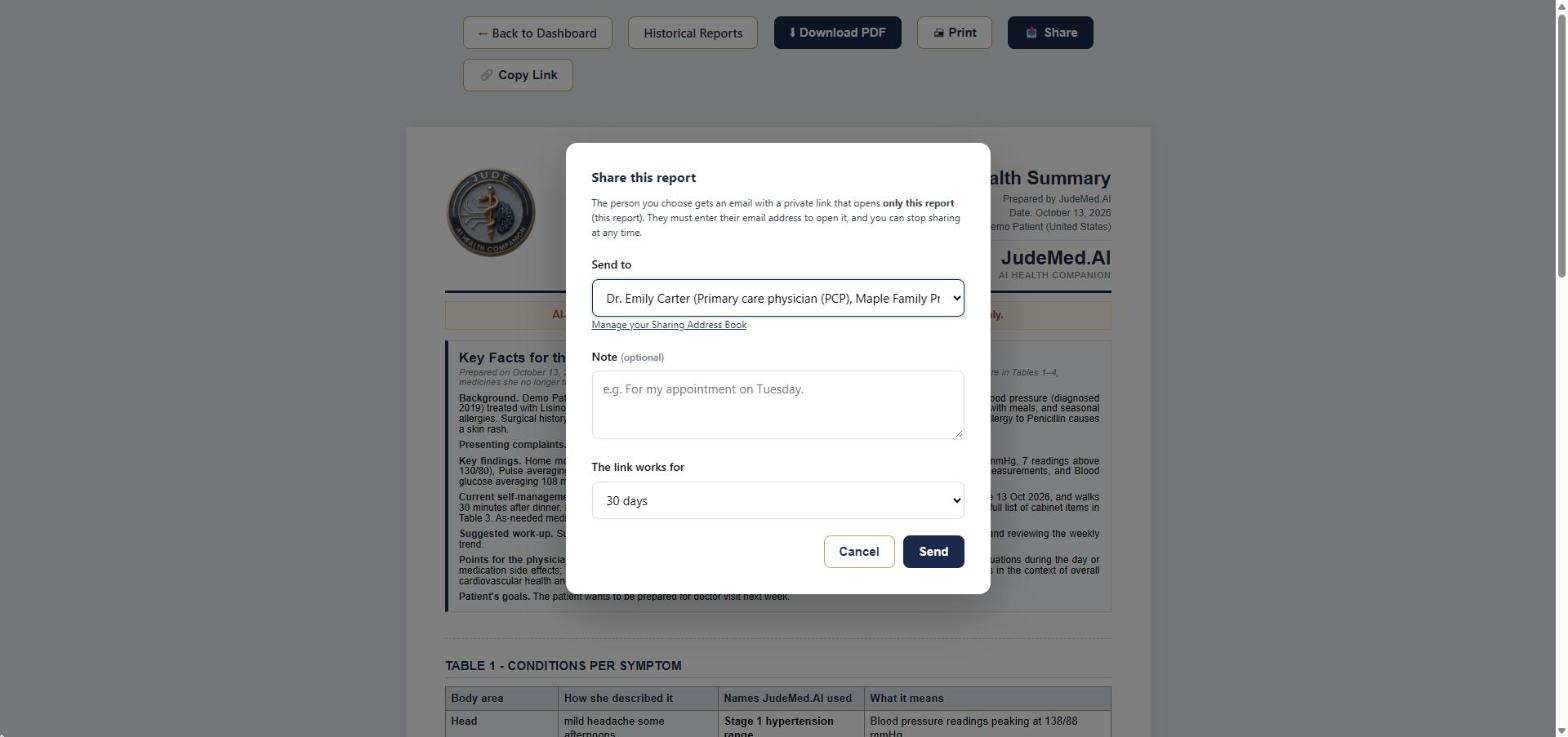
Share (by email)
- Press Share on a report.
- Under Send to choose Myself, a doctor from your Sharing Address Book, or enter a name and email address. Add a Note if you like and choose how long the link works (7, 30 or 90 days).
- Press Send. The person gets an email with a private link that opens only this report; they must enter their email address to open it. The email itself contains no health information.
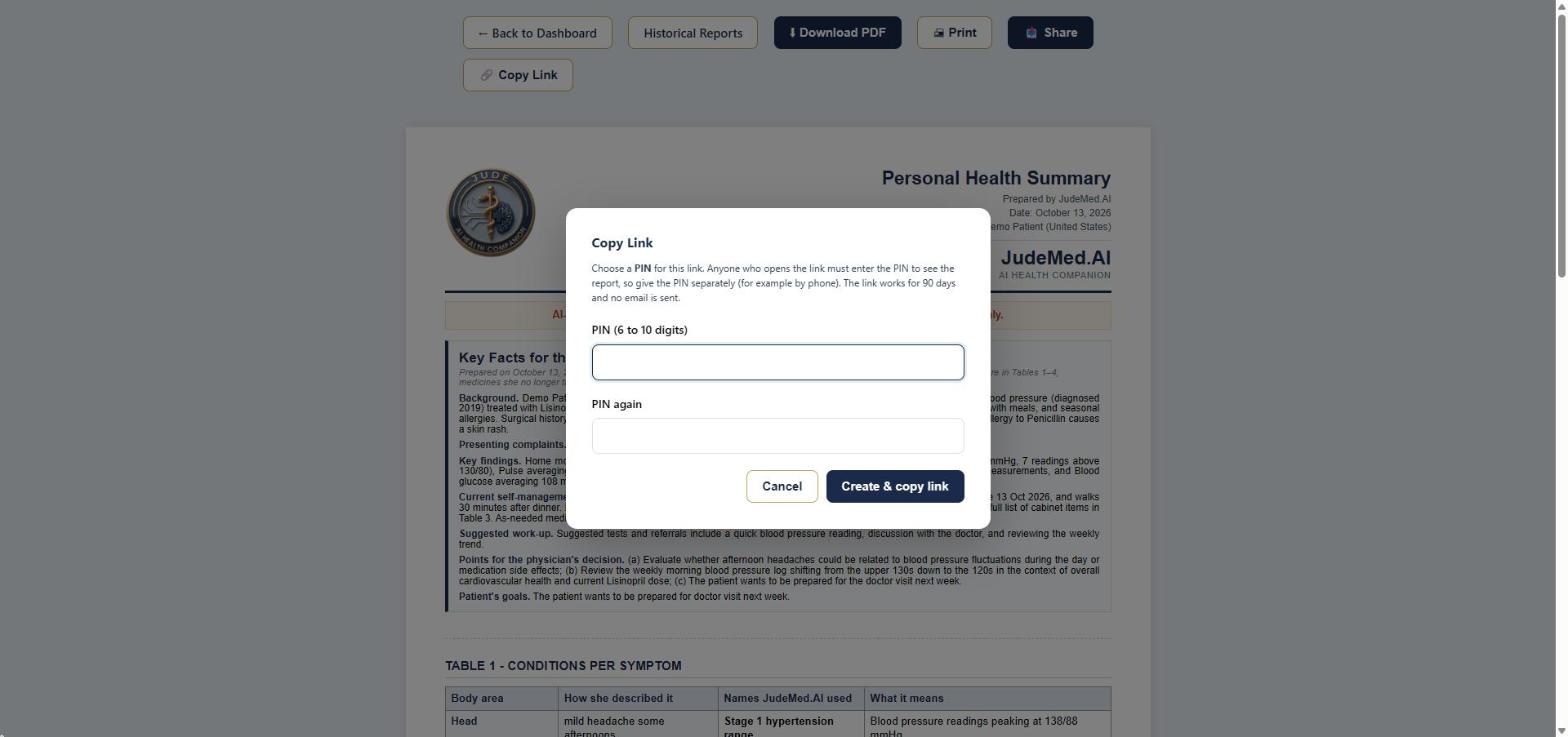
Copy Link (with a PIN, no email)
- Press Copy Link and choose a PIN of 6 to 10 digits (twice).
- Press Create & copy link. The link (valid 90 days) is copied; paste it into a message or a practice portal and give the PIN separately, for example by phone.
Under each report you see who it was shared with, how often it was opened, and Copy Sharing Link, Renew Link (a new link is emailed and the old one stops) and Stop sharing. After 10 wrong email or PIN entries a link locks itself.
Settings
Settings overview #
Where: Menu → Settings → All settings
- Open Settings. Every area has its own button: Locale & Units, Account, Security, Voice Settings, Sharing Address Book, Plans & Billing, AI processing, Support access and Delete my account.
- Press a button to open that area; ‹ All settings takes you back.
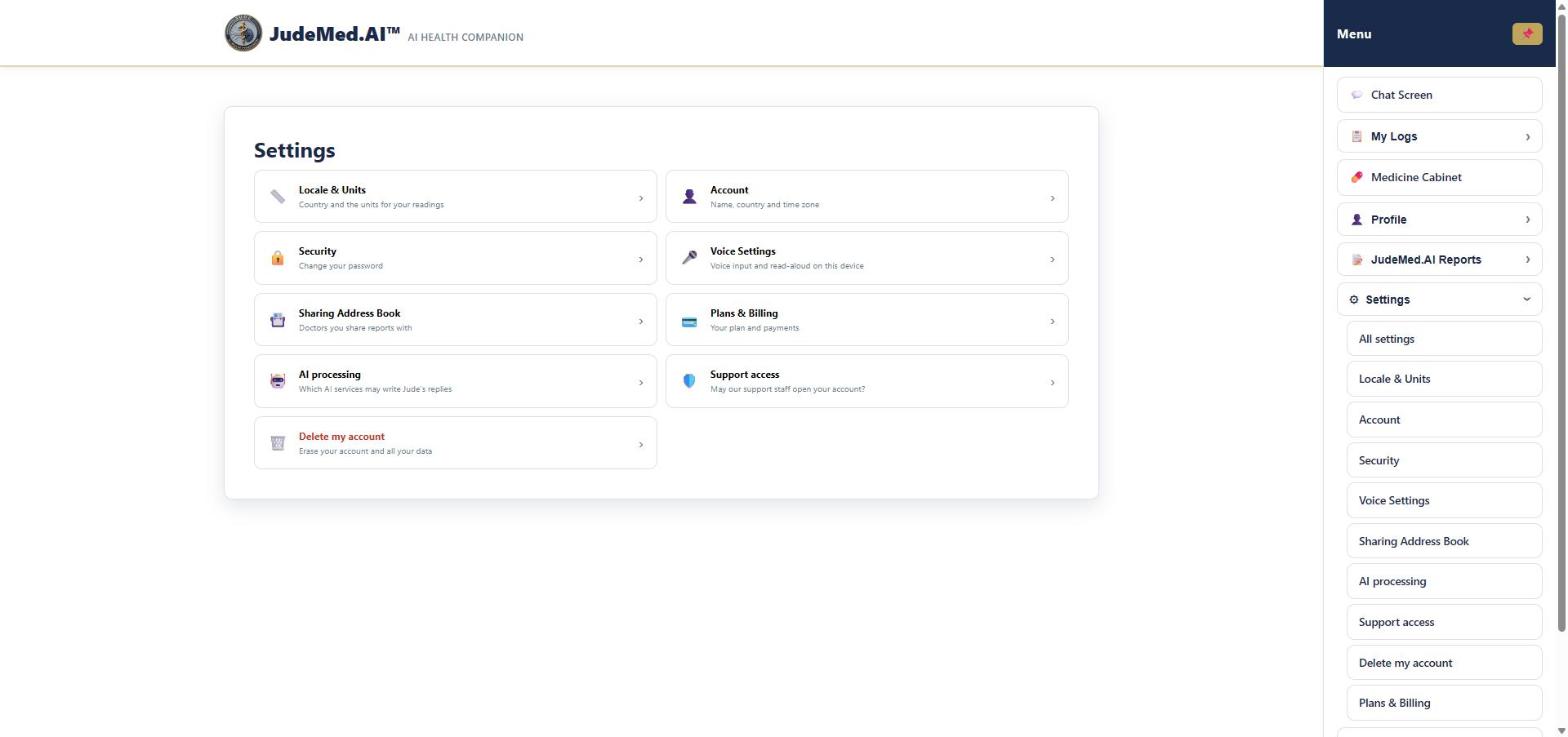
Settings
Locale & Units #
Where: Menu → Settings → Locale & Units
- Choose your country (Locale). Apply the usual units for this country fills in the common choice.
- Pick one unit for each measure: weight (kg / lbs), height (ft + in / inches / cm), blood glucose (mmol/L / mg/dL), body temperature (°C / °F) and water (ml / fl oz).
- Press Save units.
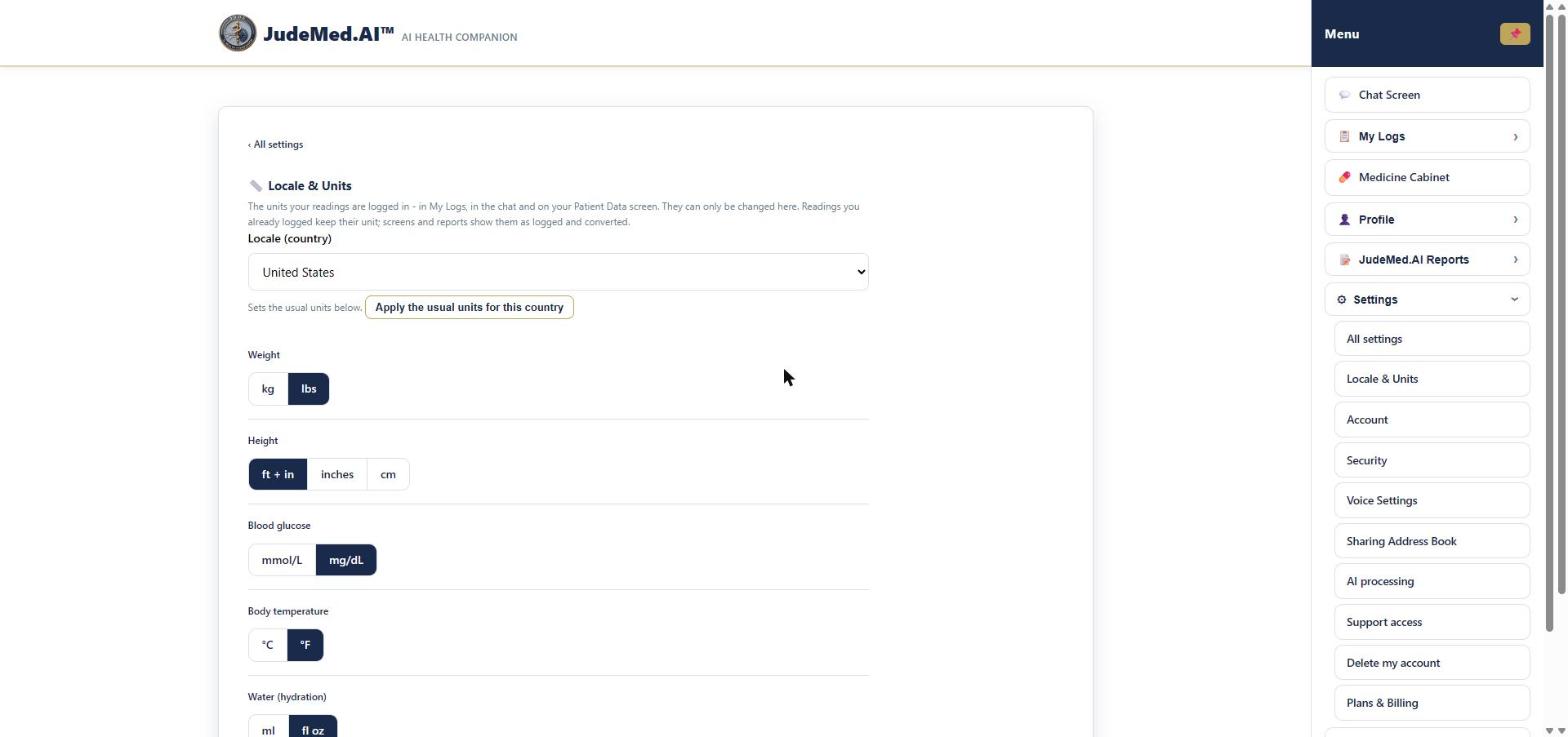
All logging uses these units (My Logs, the chat, Patient Data); they can only be changed here. Readings you logged earlier keep their unit and are shown as logged and converted. Blood pressure (mmHg), pulse (bpm) and SpO2 (%) have one unit.
Settings
Account #
Where: Menu → Settings → Account
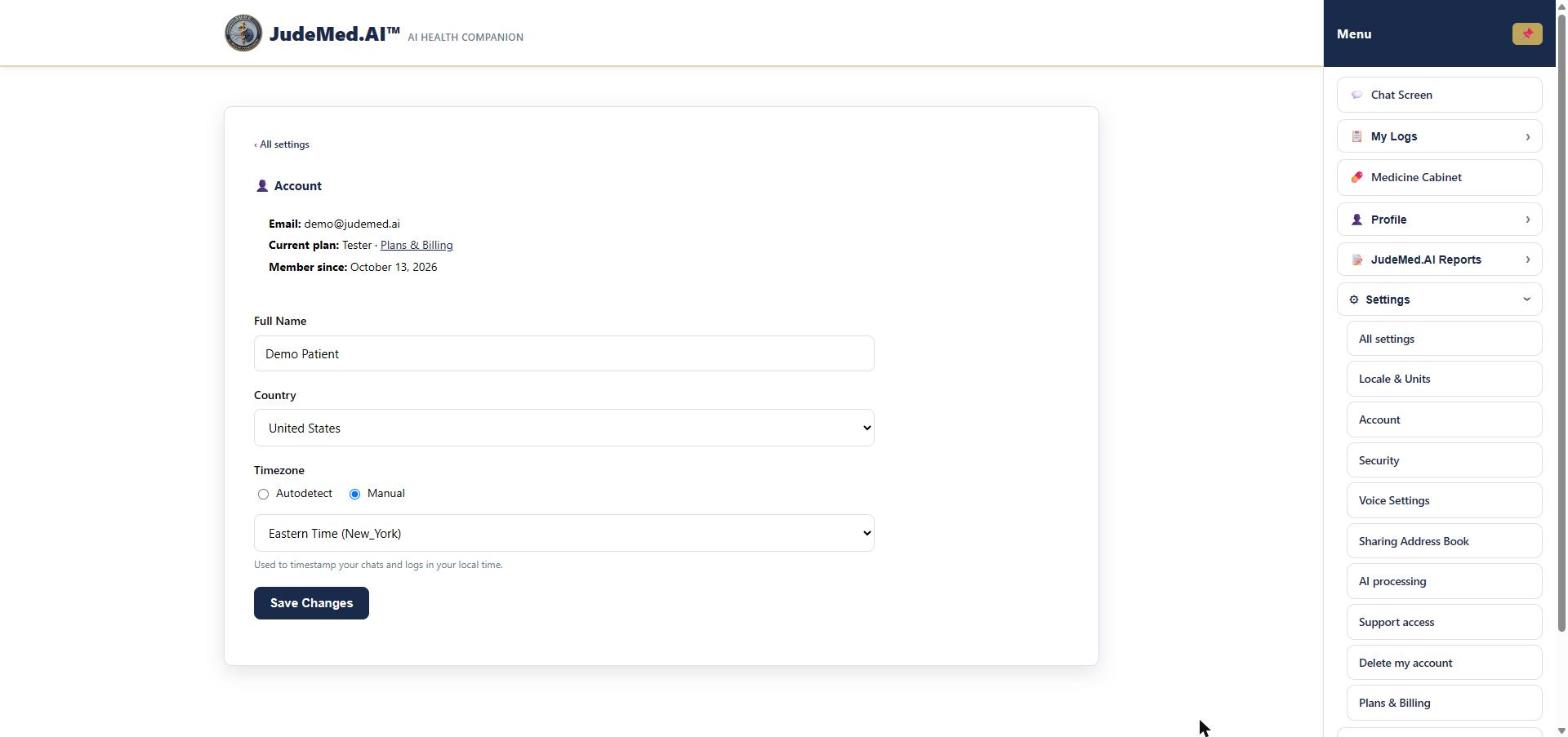
The top shows your email address, your current plan (with a link to Plans & Billing) and the date you joined.
- Change your Full Name or Country if needed.
- Timezone: Autodetect uses your device's time zone; Manual lets you pick one from the list. Your time zone is used for the times in your chats, logs and reports.
- Press Save Changes.
Settings
Security: changing your password #
Where: Menu → Settings → Security
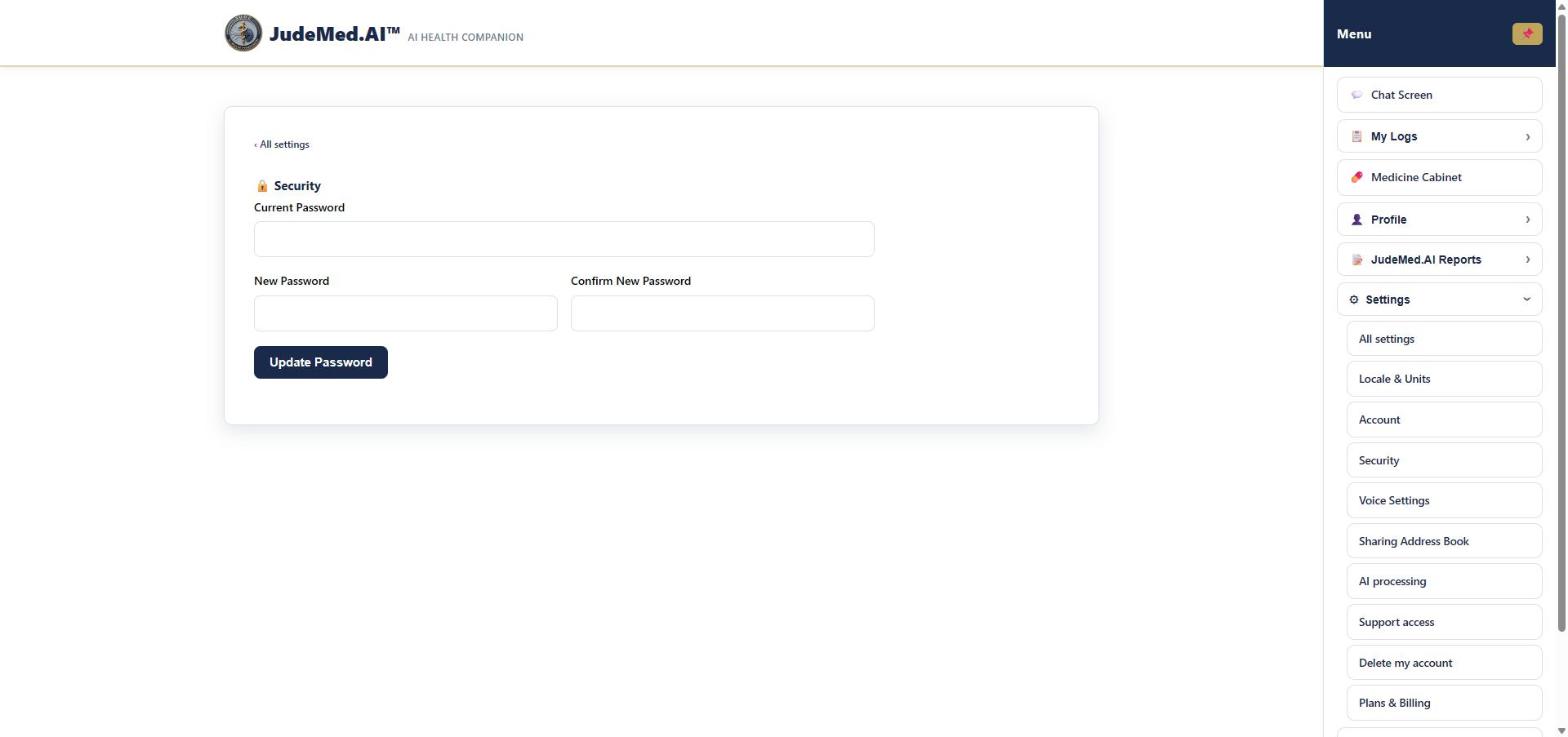
- Enter your Current Password.
- Enter the New Password (at least 8 characters) and again under Confirm New Password.
- Press Update Password.
Changing your password signs you out on every other device. Forgot it? Sign out and use Forgot password on the sign-in page.
Settings
Sharing Address Book #
Where: Menu → Settings → Sharing Address Book
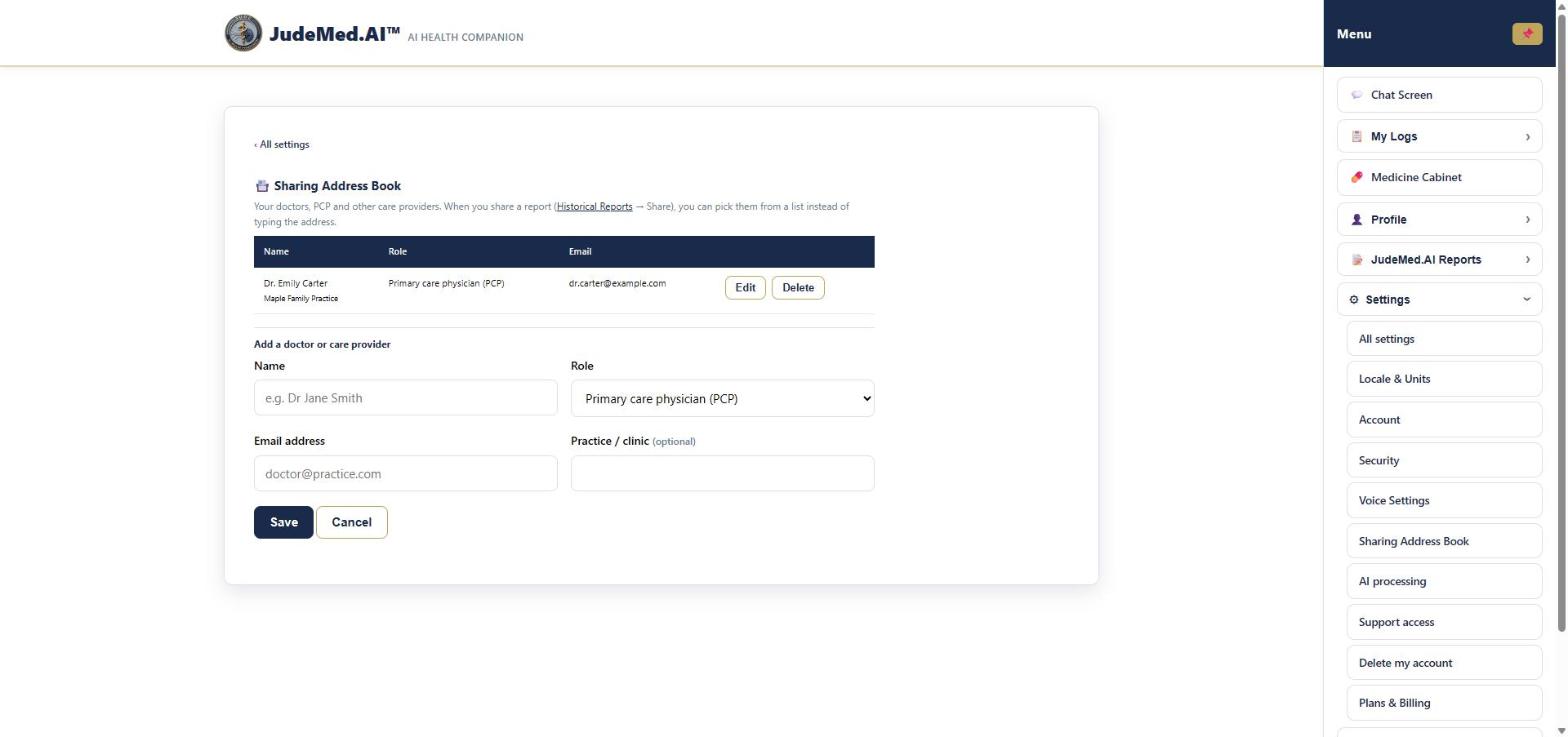
- Open Settings → Sharing Address Book.
- Under Add a doctor or care provider enter the Name, Role (for example Primary care physician (PCP)), Email address and Practice / clinic (optional), and press Save.
- When you share a report, pick the person from the list. Use Edit or Delete to change entries; reports already shared are not affected.
Settings
Plans & Billing #
Where: Menu → Settings → Plans & Billing
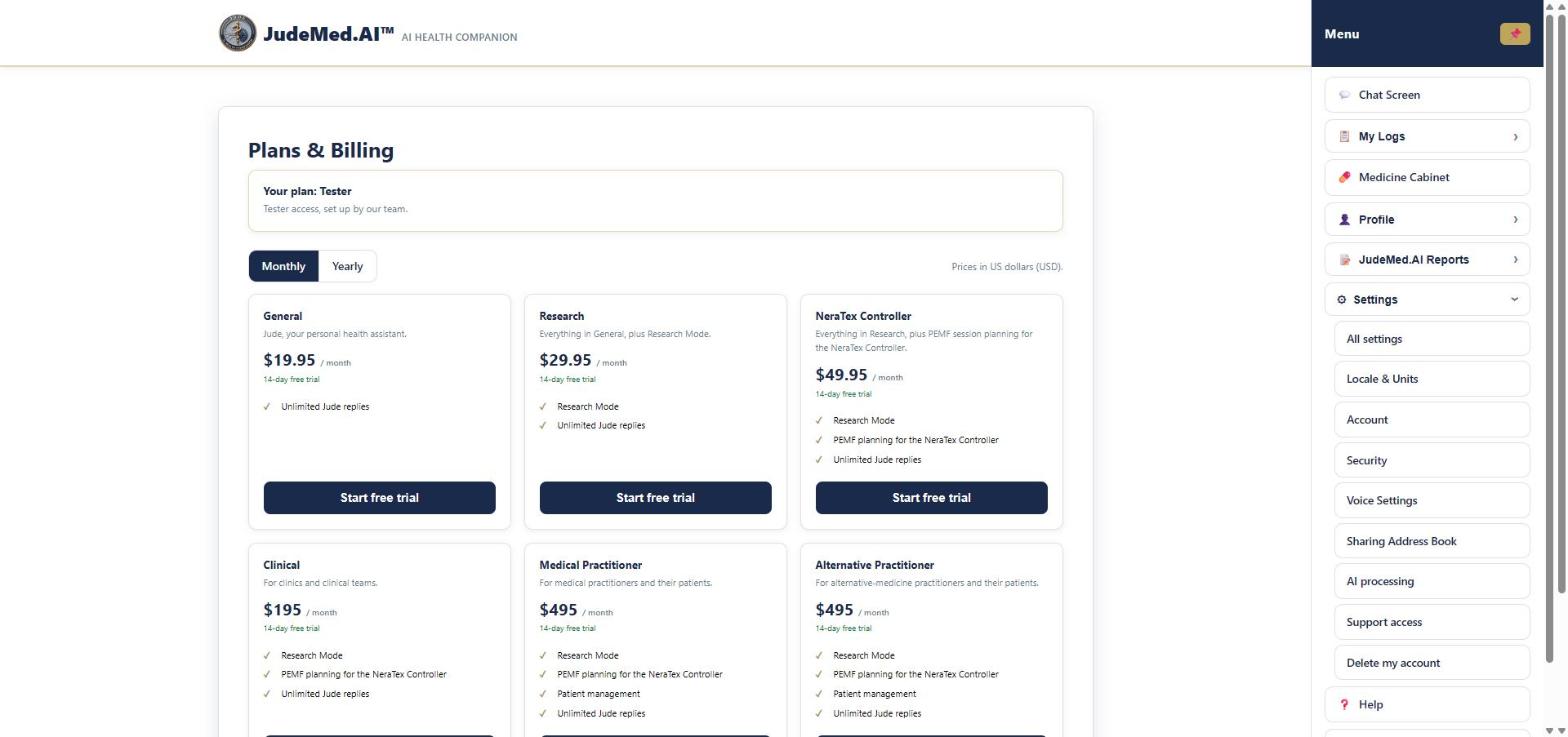
- Open Settings → Plans & Billing. The top shows Your plan.
- Choose Monthly or Yearly to see the prices (in US dollars).
- Press Start free trial (or change plan) on the plan you want. Payment is handled by Stripe.
| Plan | For |
|---|---|
| General | Jude, your personal health companion |
| Research | Everything in General, plus Research Mode |
| NeraTex Controller | Everything in Research, plus PEMF session planning for the NeraTex Controller |
| Clinical User | Research, testing, validations and trials |
| Medical / Alternative Practitioner | Practitioners and their patients, with patient management (For practitioners) |
Paid plans start with a 14-day free trial. JudeMed.AI never sees your card number. Manage billing opens Stripe's billing page, where you can update your card, see Stripe's receipts or cancel.
Invoices: for every payment you get a PAID invoice from Vertex Catalyst Group by e-mail (a PDF), and a credit note if a payment is refunded. They are listed under Invoices on this page; press Download to save one. Payments in US dollars are invoiced by Vertex Catalyst Group LLC (numbers VCGU-JUD-…), payments in rand by Vertex Catalyst Group (Pty) Ltd (VCGR-JUD-…). An invoice shows your name, e-mail and plan only - never health information. Need an invoice for an earlier payment? Ask through the contact form.
Settings
AI processing #
Where: Menu → Settings → AI processing
- Open Settings → AI processing. Each AI service is listed with what it does and your current choice, with the date you made it.
- Change a service to Allow or Don't allow and press Save my choices.
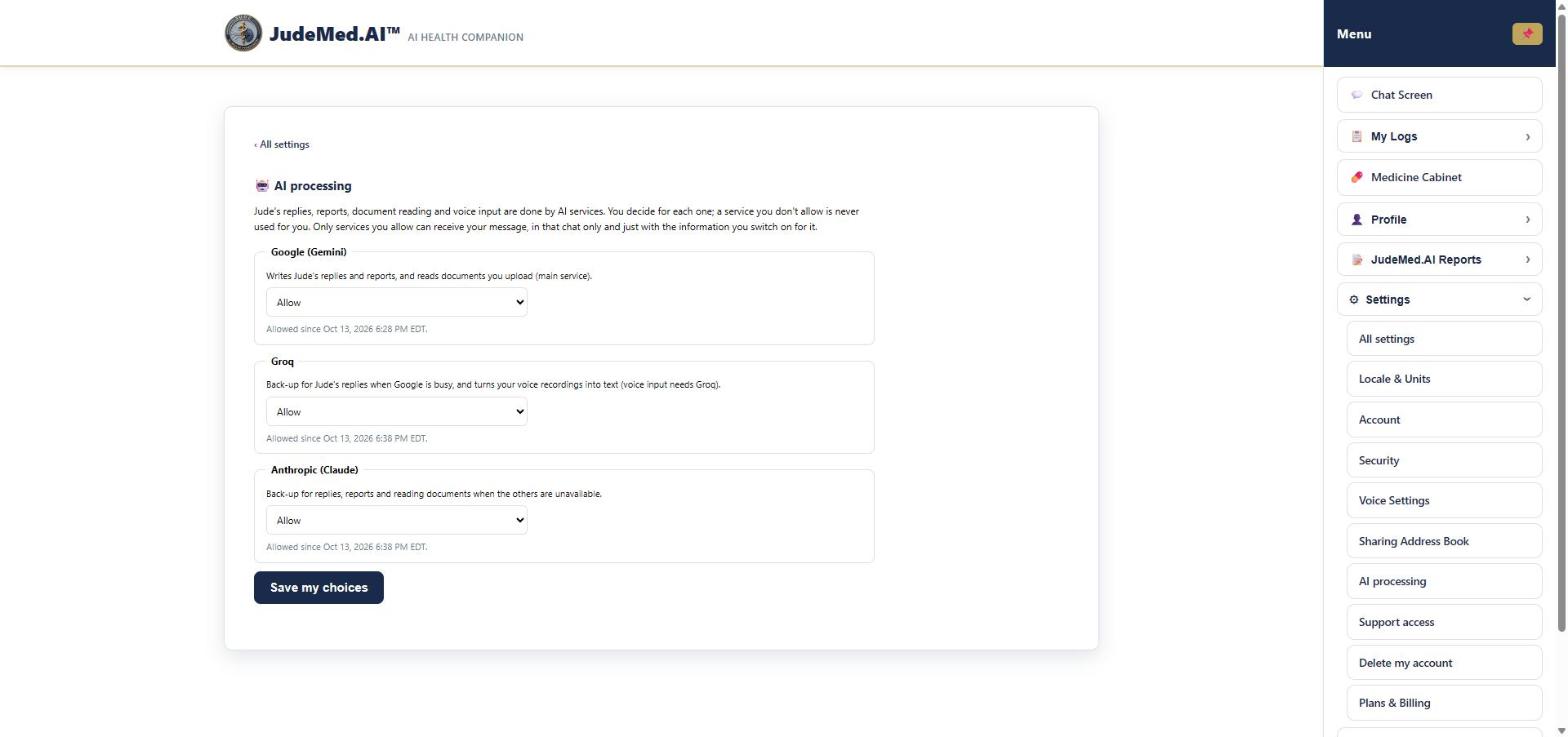
A service you don't allow is never used for you. Only services you allow receive your message, in that chat only and just with the information you switch on for it. At least one service must be allowed for Jude to reply; voice input needs Groq.
Your profile
Link a NeraTex Controller #
Where: Menu → Profile → NeraTex Controller
Link your NeraTex Controller to your account with a 6-digit code, without typing your password on the Controller.
- On the Controller, find its Device ID under System Information (for example E8:F6:0A:A5:77:5C).
- Open Profile → NeraTex Controller, enter the Device ID and press Get a code.
- On the Controller open JudeMed.AI → Link with code and type the code. It works once and only for 10 minutes; after 5 wrong tries, get a new code.
The Controller is then signed in to your account and syncs your PEMF session plans (see NeraTex Controller). Linked Controllers lists the Controllers signed in to your account, with the Modules each one has reported (NeraTex PEMF Module, NeraTex SCFA Module or the LAB board): plugged in now, or when it was last seen. A module that is not plugged in stays listed, and its plans are kept ready on the Controller. Unlink signs one out; the plans already saved on it stay there, and you can link it again at any time. A Controller signed in to another account must be signed out there first.
Your Jude plans sync to the Controller while your plan includes the NeraTex Controller (the NeraTex Controller, Clinical User and practitioner plans, and Tester access). If it ends, the Controller stays signed in and keeps working on its own: plans already on it, groups and sessions keep working, and session results still reach your records; new Jude plans sync again once the plan is active. The Controller's mode follows your account: Shared once you have children in Family Mode, Practitioner (clinical) with a practitioner plan, otherwise Single.
Settings
Support access #
Where: Menu → Settings → Support access
- Open Settings → Support access. The Status shows whether JudeMed.AI support staff may open your account to help you (for example to check a problem you report).
- Press Allow support access or Stop support access.
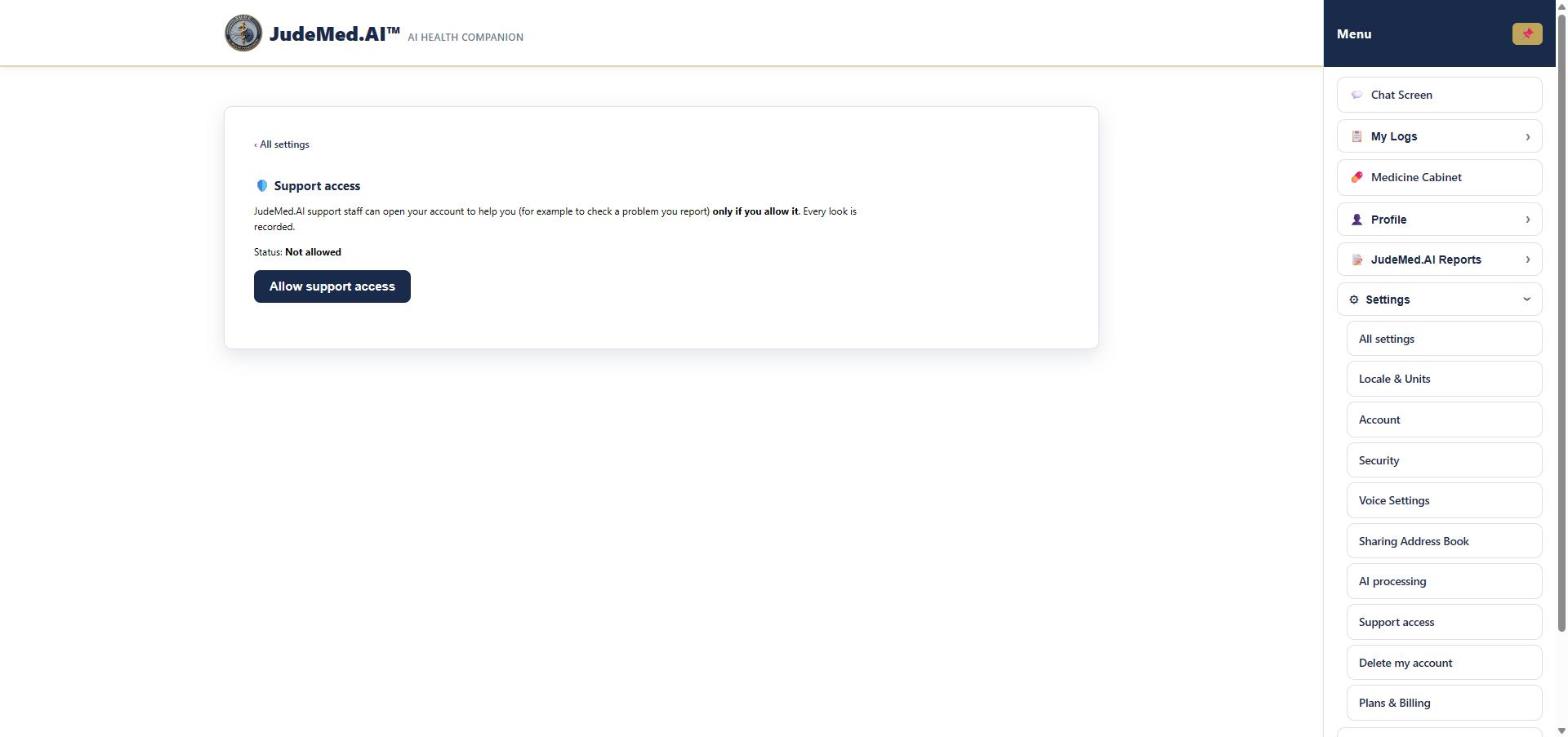
Support staff can open your account only if you allow it, and every look is recorded.
Settings
Delete my account #
Where: Menu → Settings → Delete my account
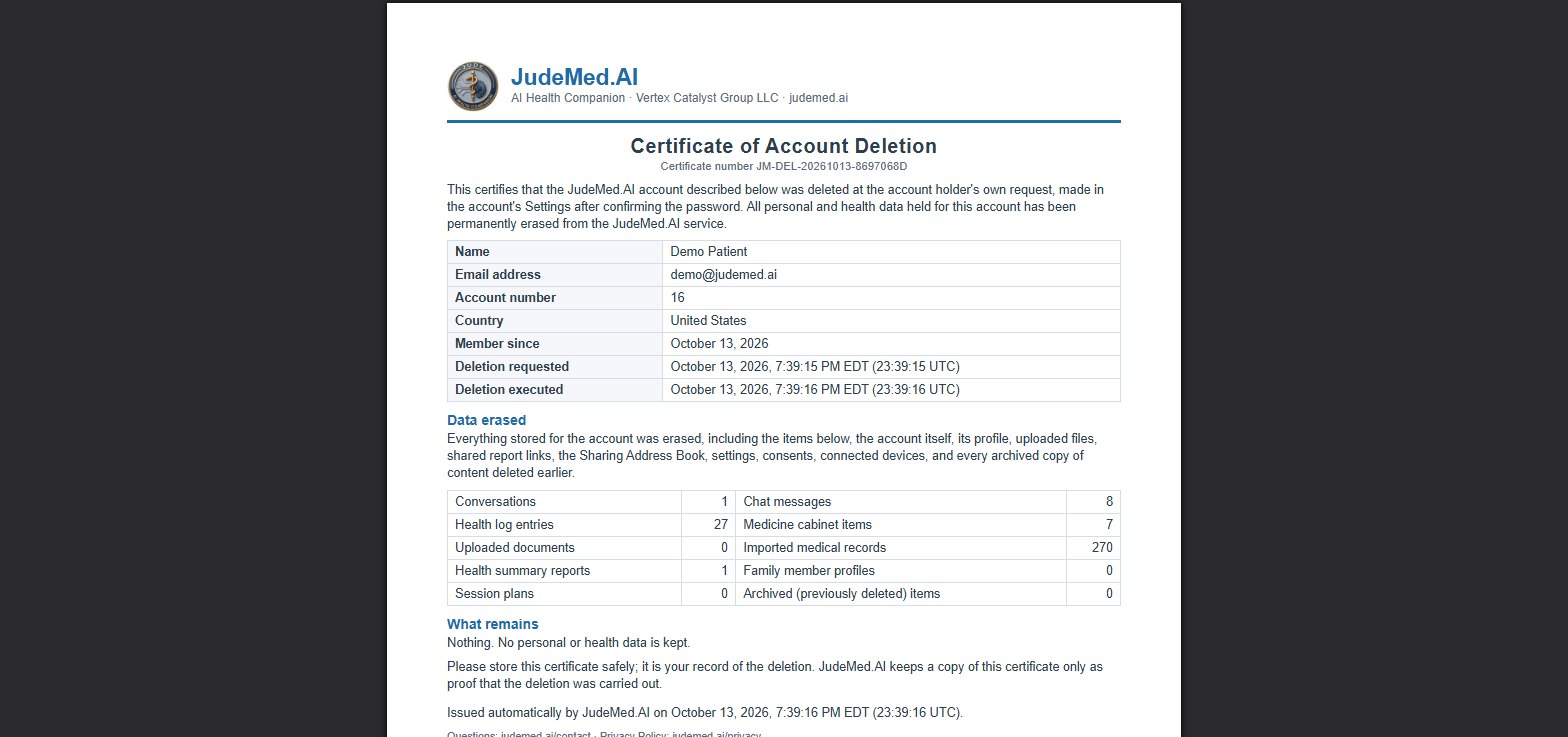
Deleting your account erases everything at once: chats, logs, medicine cabinet, profile, documents, imported records, reports, shared links, your address book and every archived copy of things you deleted before. An active subscription is cancelled. It cannot be undone, so ask for a copy of your data via Contact first if you want one.
- Open Settings → Delete my account.
- Enter your password and type
DELETE, then press Delete my account permanently. - Your browser asks once more: "Last check: delete your account and ALL its data permanently? This cannot be undone." Press OK.
- The page Your account has been deleted appears and you are signed out. Download your certificate there; it is also emailed to you.
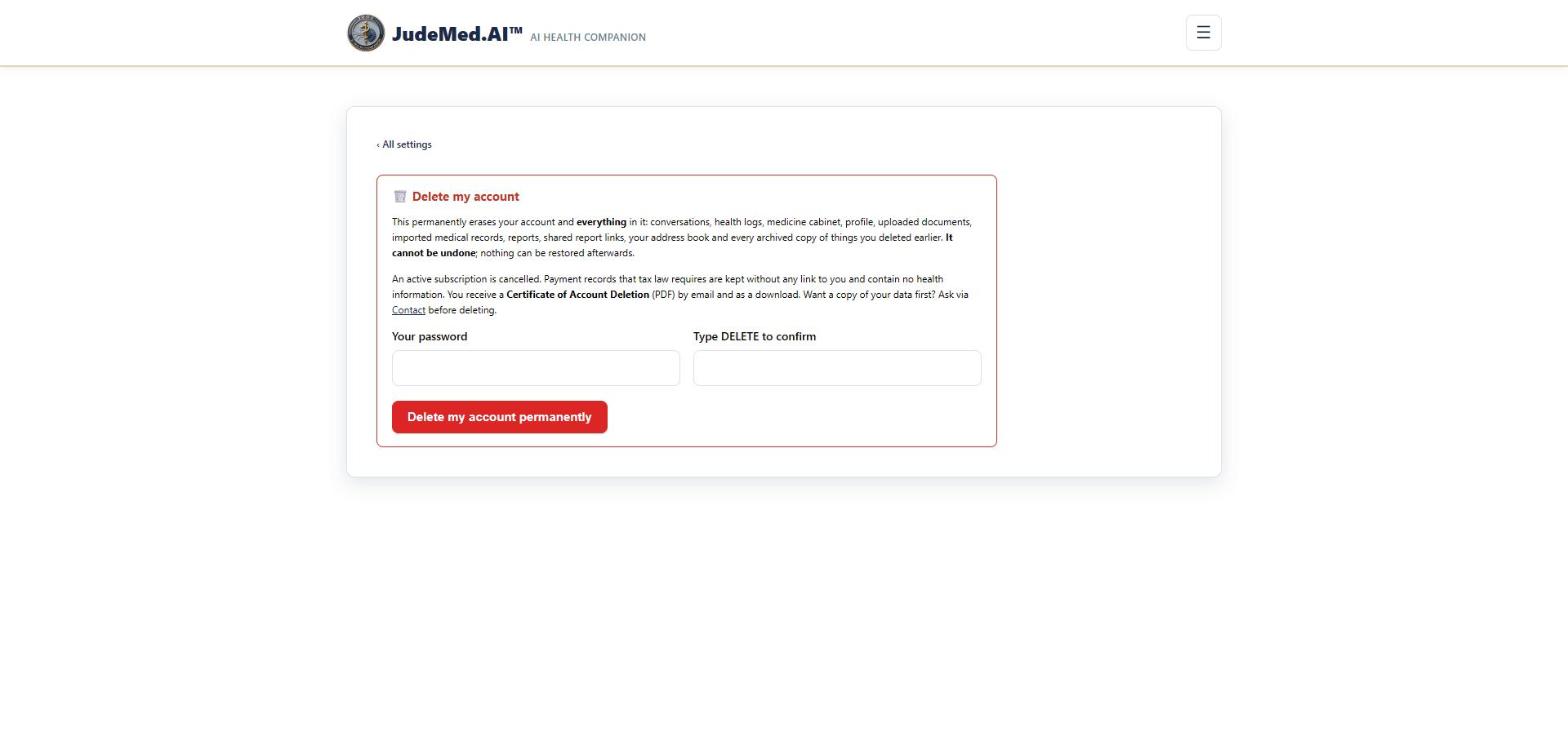
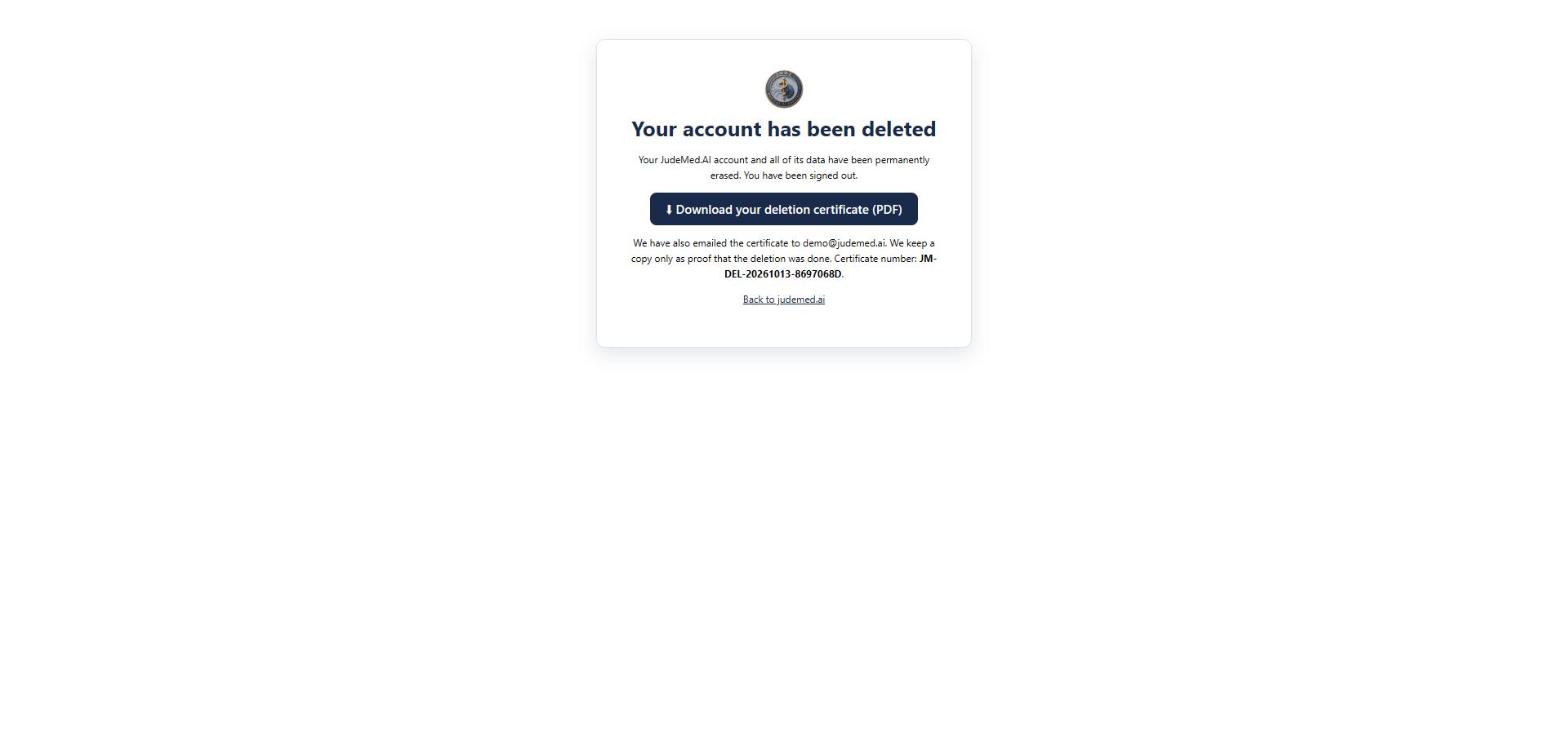
The Certificate of Account Deletion (PDF, one page) shows your details, what was erased, and the date and time you asked and the date and time it was done. JudeMed.AI keeps a copy of the certificate only as proof that the deletion was done (no health information). Payment records, which tax law requires, are kept without any link to your account; invoices issued to you (with the name and e-mail on them) are kept for 7 years after the financial year in which they were issued, then their customer details are deleted.
NeraTex Controller
NeraTex Controller: planning PEMF and SCFA sessions #
Where: Chat Screen → /pemf or /scfa (NeraTex Controller, Clinical User and practitioner plans, Tester access)
With a plan that includes PEMF session planning, Jude helps you plan wellness sessions for the NeraTex Controller and its modules. Plans are made in the chat; sessions always start and stop on the NeraTex Controller's touchscreen, never from the website.
/pemfmakes PEMF plans: always on the mat, for the NeraTex PEMF Module. They are named PEMF-PLAN1, PEMF-PLAN2 … and run at level 12, set by the Controller./scfamakes SCFA plans (Skin Conducted Frequency Application): skin electrodes, for the NeraTex SCFA Module. They are named SCFA-PLAN1 …; the level (1 to 11) is set on the Controller. Until the NeraTex SCFA Module is released,/scfais for test users only.- The V1.0 LAB board runs both. To save a plan for the LAB board only, say so (for example "save it for the LAB board").
- In a chat type
/pemf help(or/scfa help) to see the commands./pemf search [topic]searches the session library. - Make a plan:
/pemf single [topic](one session),/pemf weekly [topic](7 days) or/pemf chronic [topic](longer, you choose the duration). Jude drafts it and saves it when you say so. - Manage your plans:
/pemf list,/pemf show plan1,/pemf plan1(edit, add sessions, rename),/pemf plan1 name Shoulder,/pemf delete plan1,/pemf summary. In/pemf, "plan1" means PEMF-PLAN1; in/scfait means SCFA-PLAN1. Each list shows only its own plans and the module that runs them. - On the NeraTex Controller choose the plan and start it (Once or Loop).
/pemf statusshows the running plan and/pemf historythe sessions you ran, with how each ended (for example "electrode came off the skin"). /pemf exit(or/scfa exit) returns Jude to the normal chat.
PEMF and SCFA sessions are a wellness tool and do not replace care from your doctor. The session settings come from the device's library; the website never sets intensity.
Privacy & your data
Privacy and your data #
Where: Footer → Privacy Policy
- Your health information is visible only to you (and to clinicians you choose to share a report with, or people you send a conclusion link).
- You choose which AI services may process your messages (AI processing) and, per chat, what Jude can see (What Jude can see).
- You can ask for a copy of your data at any time via Contact.
- When you delete something (a chat, a document, a log entry) it is removed from the service; a sealed archive copy is kept while your account is open, only to restore it at your request. Reports you delete are erased permanently.
- You can delete your whole account yourself (Delete my account). Then all your data and the archive are erased, and you get a deletion certificate (PDF); we keep a copy of that certificate as proof, plus the payment records and invoices that tax law requires (invoices for 7 years after their financial year), unlinked from your account.
- The medicine-name list (Medicine names) holds medicine names, ingredients and registrations only, never who uses them.
- The sign-up and contact forms use a security check by Cloudflare (Turnstile) against automated sign-ups. It receives technical browser information and your IP address, never what you type or any health information.
The full details are in the Privacy Policy (including the Consumer Health Data section) and the Terms of Service.
For practitioners
My Patients and Chat Rules (practitioner plans) #
Where: Menu → My Patients → Patient List / Chat Rules
Practitioner plans (Medical Practitioner, Alternative Practitioner) add My Patients to the menu.
Patient List
- Under Invite a Patient enter the first name, last name, email and (optionally) phone, and press Send Invitation. The patient gets a secure registration link (valid 7 days); their account is linked to you automatically. Open invitations are listed under Pending Invitations.
- Your linked patients appear under Your Patients. View as Patient opens a dedicated Practitioner Chat in that patient's account.
- In your own chats,
/patient [name]links a patient to the conversation.
A patient's own conversations stay private and are read-only for you (🔒).
Chat Rules
- Open My Patients → Chat Rules.
- Describe in plain language your background, methods, philosophy and any limits Jude must follow, and press Save Chat Rules.
The rules apply to your chats and to every chat of your patients. Jude always still gives urgent emergency safety guidance when needed.
Help
Questions and troubleshooting #
- Jude says it cannot see my logs or profile.
- Access is set per chat. Type
/enablein that chat, or press ⚙ Settings under it, and turn on what Jude may use. - Jude does not reply at all.
- Check Settings → AI processing: at least one AI service must be allowed.
- The 🎤 button does not work.
- Voice input needs Groq (Settings → AI processing) and your browser's permission to use the microphone.
- A reading was logged in the wrong unit.
- Check Settings → Locale & Units. Delete the wrong entry in My Logs and log it again; JudeMed.AI asks when a value looks like the other unit.
- A medicine shows a different name than I typed.
- JudeMed.AI uses the registered name. Press Keep my spelling in the Medicine Cabinet to keep yours (see Medicine names).
- I don't see Menstrual Cycle in My Logs.
- It is hidden when your biological sex is set to male in Profile → Patient Data.
- My report is still "being prepared".
- Reports take a few minutes. You can leave the page; it appears under JudeMed.AI Reports → Historical Reports when ready. If it failed, generate it again.
- My doctor cannot open the shared link.
- They must enter the email address it was sent to (or the PIN for a Copy Link link). After 10 wrong tries the link locks; use Renew Link or make a new one.
- I cannot find my health system for the MyChart import.
- Only health systems that offer Epic patient access appear. Search by the organisation's name or city.
- I can't switch on Research Mode.
- It needs a Research plan or higher and works only on a new, empty conversation.
- Is Jude a doctor?
- No. Jude provides information to help you understand and prepare. Discuss decisions with a qualified professional; in an emergency call your local emergency number.
Still stuck? Contact us.